Monday, July 24, 2017

Cryptocurrency Mining Rig Build – 2nd Rig & Video Overview

Project Index:
I was able to get my 2nd Rig up and running, showing the "stacked" configuration of my case design.


The hardware is identical to the 1st one, but instead of 1060s I am running 6x GTX 1070s.  Here is the component list for the 2nd Rig.

In addition to higher hash rates (average 32Mh/s per card), they generate a LOT more heat.  Had to install a 4x fan setup to push the heat away towards the room's exhaust vent.


Here are the videos I put together outlining the entire process.


Thanks for looking!

CryptoCurrency Mining Rig - Performance Tweaks to Maximize profitability

Project Index:

With the hardware installed, on to the software portion of this build. Installing Windows 10 on the M.2 SSD is the same as any system, using a USB connected DVD drive or better yet a USB drive configured to install Windows.  Don’t worry about drivers, as any modern motherboard with 6 PCIe lanes should handle driver installation automatically during the installation process.**

**Note – You may have to modify certain settings in your system BIOS to allow for the use of 6 GPUs at the same time within Windows.  Refer to the manual for your specific motherboard for details.

With the particular Motherboard I am using, I had to make sure the following settings were configured as shown below.

Verify that BIOS settings are as follows:

  • Windows OS > Windows 10 > Enabled
  • PCI Settings > 4G > Enabled
  • PCI Settings > PCI > Gen1

The following are the tips that work for my system specifically, and may not necessarily be the best thing for your build, but maybe it will help you in some way.

Once Windows has fully installed, you want to run Windows Update and ensure that Windows Anniversary Edition update is installed. As of July 2017, if you are fully up to date, you will have that update as well.  Once all of the updates are completed, give your system a reboot, and then check out the Device Manager and ensure that all 6 GPUs are showing up.


If all the GPUs are showing up, we can assume that Windows automatically installed the correct GPU drivers, and its time to see if mining works properly with these cards. For my situation, installing the most up to date NVIDA GeForce drivers from Nvidia’s website actually made my mining performance worse, so I have been using using the drivers installed automatically by Windows instead.  If your cards aren’t showing up, or you are experiencing poor mining performance, best to uninstall graphics drivers using the DDU (Display Driver Uninstaller) utility, and let Windows reinstall the drivers after reboot.


There are various mining applications you can run, along with mining pools you can join.  I chose to go with NanoPool and use Claymore’s Dual Miner to mine Ethereum. There is some configuration that will need to be done, but nothing too difficult. Once everything is set up, lanch the .bat file to start mining Ether. Off the bat, stock GTX 1060s will get between 18-19 MH/s. With a little bit of overclocking I was able to get on average 22 MH/s per GPU, and also reduced my power draw.


I was surprised to find that with this “under-clock” of the GPU, this system is only pulling around 35 watts from the wall when idle, and around 560W from the entire systems during mining operations. Not bad at all, considering I am getting a combined total of 132 MH/s from this system.


At this point you are pretty much done.  I do recommend installing some monitoring  / remote access software to check on the system when you are away. With everything up and running, you can just leave it alone and it will keep mining away.  As long as there is sufficient cooling, it should be pretty maintenance free, and can run for weeks at a time without any issues.


Thanks for taking a look at my project blog, and hit up the next post if you would like to see a video overview of the entire build process. I will also be building a 2nd system in the following weeks with GTX 1070s! So take care, and be sure to check back. Thanks.

CryptoCurrency Mining Rig - Parts List & Assembling the Ethereum Rig

Project Index:
For this post, I am just going to go over the components I used for the build. Not really going to do into detail on how to put the parts together, as it is no different from a normal PC build, and there are TONS of other resources available for that. I will just focus on things unique to this case and Cryptomining specifically.


Here is the component list for this build. As mentioned before, the GPUs are from 3 different manufactures, but they are all GTX 1060s, so linking their Overclocking profiles will still be easy to do.  All of these links will take you directly to the product on Amazon.  I will list a few options around the same price for the GTX 1060 GPUs, as availability is pretty rough right now. Which ever video card you go with, make sure it has at least 6GB of video RAM, as the DAG file for Ethereum will surpass the 3GB threshold very soon.
The following are nice to have, but not required. Helpful with troubleshooting and remote system management. I will also go over my methods for remote management in a future post.


Most of these parts are interchangeable with other components, so feel free to shop around if you think you can find a better deal with a different component. At the time of purchase, these were the best price for performance.  The Motherboard specifically is a good buy for the price, and works great with 6 GPUs with little effort.

For the most part, assembling this rig is the same as any PC. You will add the Power Supply, Motherboard, M.2 SSD, Processor and RAM.  Some people choose to just have the motherboard sit on top of the wood planks, with rubber bumper feet underneath.  I wanted things a bit more secure, so I added motherboard standoffs to the wood planks, and attached the motherboard to the standoffs with thumb screws. No need to use a ton of standoffs since the motherboard will not be sitting vertical, 4-5 should be plenty to keep things secure and supported where needed.


I also decided to add an illuminated latching switch the build. I could have just used one of these jumpers, but I wanted something that looks a bit nicer, and could be secured to the case. You just need something that will power on and off the case, and having an LED indicator is nice but not necessary.


You can choose any size you want for the button, I went with a 16mm.  Drill the mounting hole wherever you plan on having the button. Thread the button in place, and then attach the cable to the front panel headers according to the specifications of your motherboard.


The final component that is unique to this type of case is the need to use PCIe riser cards for the GPUs.  As there is not enough room or or enough PCIe x16 lanes for 6 GPUs, so we use these adapters.  This particular motherboard has 2 x16 PCie lanes and 4 x1 PCIe lanes.


We plug the x1 adapters in these lanes, and then connect the riser card to the GPUs via a USB 3.0 cable.  I prefer to use the angled USB adapters here, as there is less stress on the connectors and cables with this configuration. The pictures below should make all of clear.


With the riser cards installed, and the GPUs mounted, the build is pretty much done.  As I mentioned earlier, this design is stackable, so I wanted to show how I will be achieving this so I can add a second mining ring in the future. You can’t stack the cases directly on top of each other, as there won’t be enough room for the GPU power cables between them. You will need some sort of risers between the cases. You could probably use rubber stool feet or something similar, but I designed some standoffs to work with the 3/4in aluminum, and used my 3D printer to make them.


Here you can see how they will attach to the case, allowing for the stackable design.


And here is what the 2 cases together look like on top of the stand I built earlier.  As you can see, plenty of clearance for the GPU power cables.  Now on to software and mining tweaks.


Next up, I do a run down of performance tweaks to get the most out of your mining rig.

Sunday, July 23, 2017

CryptoCurrency Mining Rig - Building a Mining Rig Stand / Rack with Wheels

Project Index:

With case completed, we need something to hold it up. With this many GPUs running, all with fans, it is not a good idea to have these near the ground where they can easily pick up dust and debris. This build is too wide for a standard server rack, so I went with some IKEA Lack end tables.  These are very inexpensive ($9 each), and I have used them before for other projects, like a stand for my TableTop Arcade system, and an Enclosure for my 3D Printer.


The castors are optional, but as mine will be housed in a utility room, I may have to move things around when servicing HVAC components, so easily scooting things around using wheels is a must for me. Full material list is as follows:


Assemble the first end table as shown in the instructions provided by IKEA. If you have never assembled anything from IKEA, they make it incredibly simple. Once assembled, you will only be using the top of the 2nd end table, the legs can be discarded. We need the top of the 2nd table to act as a base for the stands, to give the bottom some rigidity, and have a good mounting platform for the castors.


The next step is optional, but recommended.  You could just use gorilla glue to attached the bottom slab to the table legs, but I chose to also provide some corner brackets to secure things a bit more.  I didn’t have any on hand, so I printed a set of 4 on my 3D printer.  With those completed, I glued things together with Gorilla Glue, then used these brackets to hold everything in place firmly.


Once everything was dried, I flipped the stand over and measured for the castors. You will not use the hole that is already in the stand, and will need to drill your own starter holes for the mounting plates. Install all of the castors, and flip the stand back over.


Done!  Before moving on, I wanted to quickly share what I have done to ensure the room this will be housed in doesn’t get too hot.  During the summer it won’t really be and issue being that the blower for the AC keeps the room pretty chilly, but that will change come winter when the furnace is running. I already have a direct vent to the outdoors to allow for carbon monoxide produced by the furnace and water heater to escape.  I purchased an inexpensive 9in fan, and mounted it to the base of the vent, allowing it to remove heat from the room quicker and more efficiently.


Next post will cover adding the components to the system.

Thursday, July 20, 2017

CryptoCurrency Mining Rig - Building a Stackable, Open Air Mining Case

Project Index:

There are many options available to those who want to build a mining rig. You could use a normal PC Case if you only have 2-3 GPUs.  Even then the heat and space restraints make traditional cases not a great choice for mining.  Some are very simple, consisting of shelving or even milk cartons, modified to hold the required hardware.  These will work, but honestly look a bit ghetto.  Others are more elaborate cases built specifically for Crypto Mining.  These look great, but are a bit expensive coming in around 200-300 dollars.  I settled somewhere in the middle, decided to make my own open air case, but add a few aesthetic upgrades so it still looks somewhat nice.

For those that have been on my Project Blog before, you know that I take pride in my custom PC builds, and that I have a thing for black cases with blue highlights.


Design choices for this system were based upon 3 main requirements:

  1. Open Air design allowing us to easily configure the hardware in a way that it will provide adequate spacing for airflow, and maintenance when needed. When looking at 6x GPUs in one system, you must take heat into consideration. 
  2. Modular in nature, allowing it to work with a variety of GPUs, Power Supplies, and Mother Boards
  3. Stackable design to allow for minimum footprint if building multiple systems. I plan on building 2 systems in my home, so had to make sure this was an option as I don’t have a ton of extra space to have multiply systems lying around. 

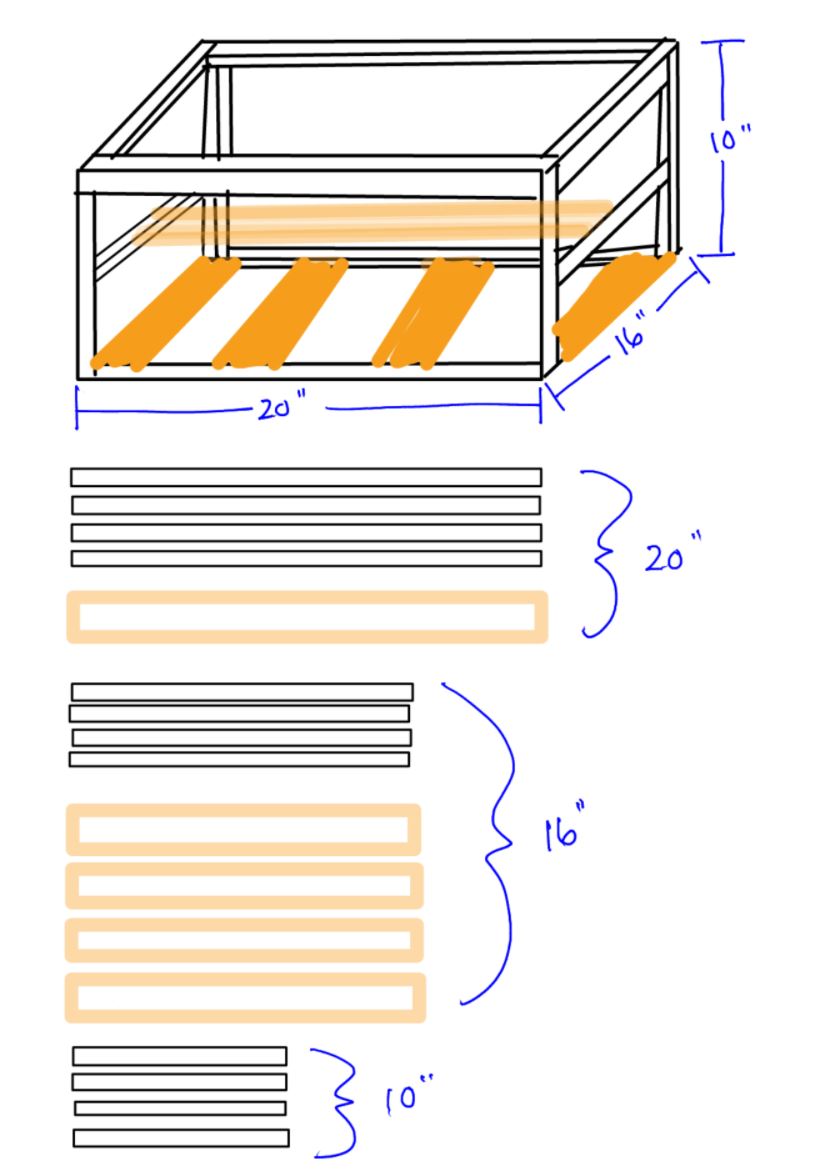
So let us begin with some basic dimensions. There are plenty of DYI sites and forums with people showing their builds, but there is very little consistency between design and sizes. So instead of following someone’s, I designed mine from the ground up.  Here are the basic dimensions
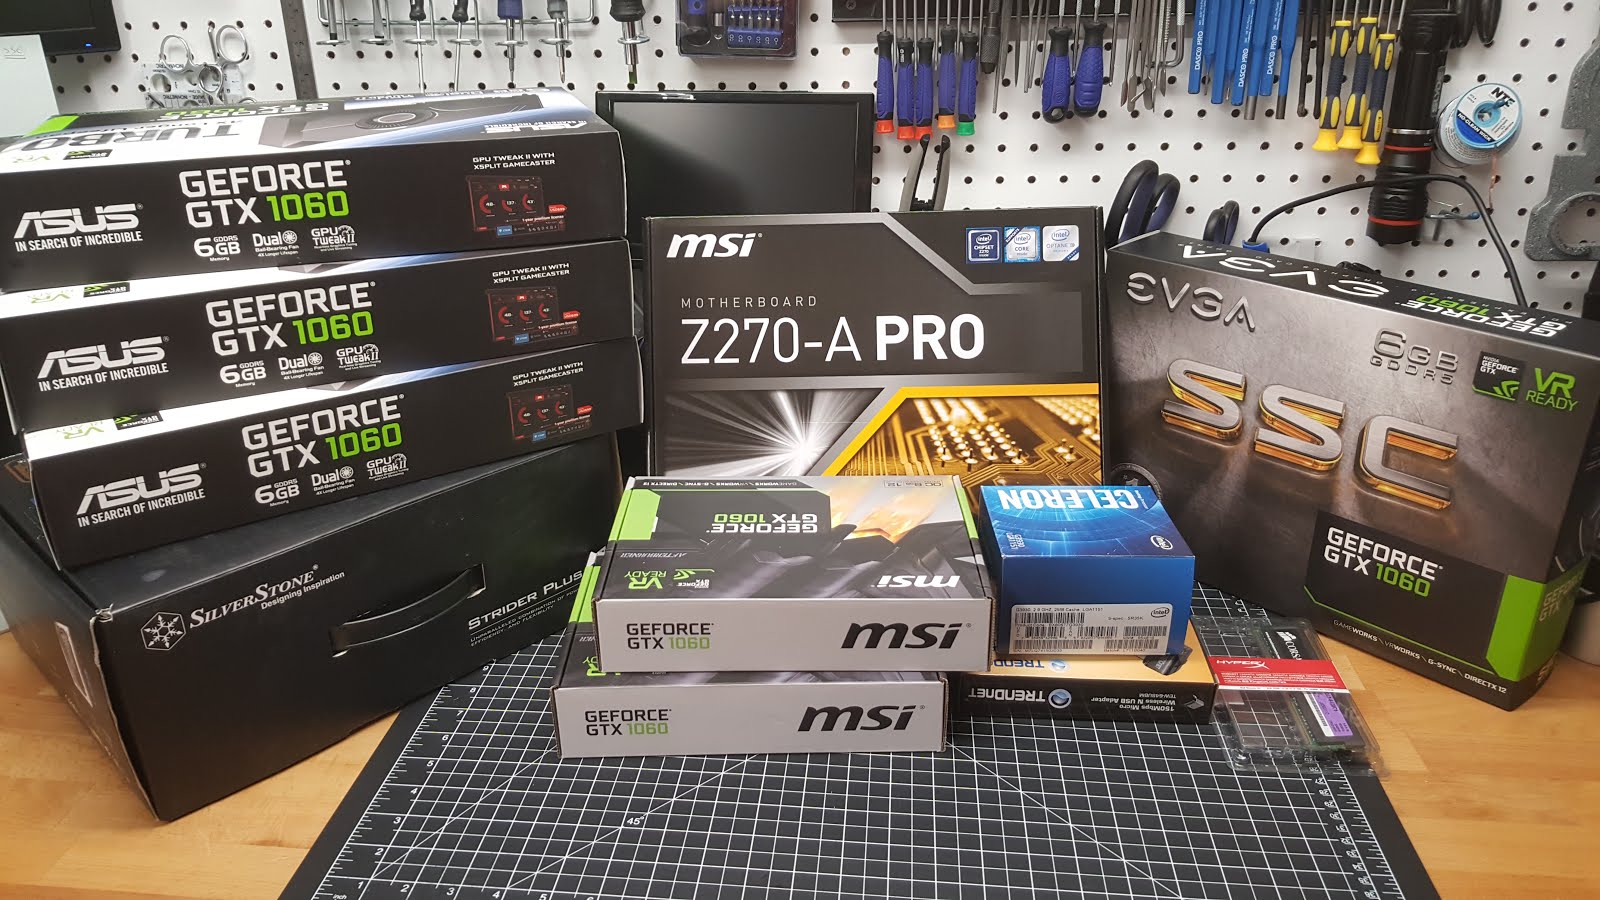


Materials
The frame of this case will be built using 3/4in Angled Aluminum from a local hardware store. Its thickness is 3/16th in and they come in lengths of 36in. The various fasteners will be listed below. Also using 3in x 3/4in finished wood planks to serve as the bottom of the case, and the GPU resting plate.  Full material list below, came to around $45, including matte black spray paint.

  • 3/4in x 3/16in x 36in Angled Aluminum  (x5)
  • 3/4in x 3in x 96in Sanded Wood Plank (x1)
  • #6-32 x 1/2in Machine Screws & Nuts  (x12)
  • #6 Flat Washers  (x12)
  • #6 Lock Washers  (x12)
  • #8 x 1in Flat Phillips Wood Screws  (x12)
  • #8 Finish Washers  (X12)
  • Matte Black Spray Paint (x1)


Additional parts that will allow for an easier build, and make things look better.

  • PC thumb screws for GPU plates and Motherboard  (x12)
  • Motherboard Standoffs  (x6)
  • Plastic Corner Brace for PSU  (x2)
  • Rubber Feet / Standoffs  (x4)
  • Illuminated PC Power Button  (x1)

After acquiring all of the parts, the first step is to cut your aluminum lengths. From the 5 longer pieces listed above you will need to cut 4x 20in, 4x 16in, and 4x 10in lengths.  Measure everything out before cutting and you should have plenty to work with.


Next are the wood plants.  Cut 4x 16in, and 1x 20in lengths.  You may need to shave a tiny bit more off each cut depending on how you cut. My 10in chop saw was just about perfect cutting right down the middle of the line, allowing the wood to drop in snug but not so tight that it would warp the frame.


With the cuts all made, its time to start assembling the frame. Starting with the front bottom section, hold them together and drill a hole through both pieces of angled aluminum with a 1/8in drill bit.  Once the hole is drilled, thread in your screw along with washers and nut to secure the parts together.

Screw [] Flat Washer [] Angled Aluminum [] Angled Aluminum [] Lock Washer [] Nut


With the two bottom front corners are assembled, start on the top front corners. Once you have the front “box” assembled, time to add the wood plants to the outside edges.  As before we will line them up and then drill using the 1/8in bit. Then thread the wood screw through the finish washer, and into the aluminum with the wood behind it.


With the two outside planks installed, time to repeat the process and build the back of the frame just was we did with the front. Once that is done, the frame should be pretty solid.  Now we add the GPU support brackets. I measured 9cm from the bottom of the case to where the GPU support bracket would be mounted. Attached the 2 supports as shown in the picture below, and then place the 20in wood plant between them, roughly 15cm from the front of the case.  With that completed, the frame is assembled, and technically could be used at this point.


From this point on, most of what I am showing is aesthetic in nature or meant to keep things more tidy.  Not required, but will make things look better and help with cable management.

Some people chose to secure the GPU plate to the case using Zip Ties.  I don’t like the look of that and would prefer to use Thumb Screws to secure them better. I measured out spacing for 6x holes to go on the top front bracket, and used my drill press to punch through, first covering it with some painters tape.  Her you can see that I did more than just the required 6x holes to give me a bit of flexibility when placing cards, just in case I have one that needs a bit more space due to heat issues.

Here is an example of how a GPU will sit both on the top frame with the thumbscrew securing it, and the GPU bracket we added to the case, where the PCIe Riser card connects to the GPU


Next I used some plastic Corner Braces to secure the PSU (Power Supply) to the case.  One on the side and one in the front was enough to keep it secure, but still easy to remove if needed.


I also drilled a larger hole to be used with a latching Illuminated PC power button. Not necessary, but I prefer to the look and function to this over the jumper cable method. (Note, I did use a wider piece of aluminum for the front side of the case to accommodate the button. If you have a smaller button, this won’t be an issue).


With the case construction completed, on to paint.  Although not necessary, I prefer the look of matte black over the scratched up aluminum and bare wood. Easiest way to paint something like this is to hand it from a wire, and spraypaint while suspended.


Give it a light coat making sure to not apply so thick as to have run lines. Allow for appropriate dry time, then apply a second coat.  After final drying stage, the case is done!

Next post will cover building a stand with rollers/castors, and then on adding the components.  As a final “extra” step, I added some carbon fiber vinyl to the GPU mounting bar, to keep the metal GPU plates from scratching off the paint.  Here is the final result, ready to accept the hardware!


CryptoCurrency Mining Rig - Intro

If anyone has been following the ups and downs of Bitcoin, you know that Cryptocurrency is very volatile. With that volatility, comes the opportunity to make (or lose) some pretty good money.  I have been following the news on these markets for a while and with Ethereum starting to gain significant value, decided to throw my hat into the ring and build my own Cryptocurrency Mining Rig.


I will break out the full build into a few different posts to keep things from getting too long and wordy, and as always, will include good pictures and even video of the build process. Over the next few days, look for the following posts to hit.

Project Index:

With the intro out of the way, let’s get started with a quick project rundown.  When considering building a system of this type, be aware there is risk involved as with any investment. When I first started putting the parts together for this project, the price of Ethereum was around $240 USD (June 27th). At that level, you could build a system within a price range of $1,800-2,400 and expect a complete payback within 80-90 days.


That is a pretty good ROI, and the rig will continue to mine well beyond that point producing some pretty good profits. So good in fact, that there was a rush of system builders trying to get in on the game, and the availability of Computer Graphics Cards (GPUs) which are normally used for PC gaming began to plummet. GPUs are very effective at mining various cryptocurrencies, and the rush of people putting together systems with 5-8 GPUs hit the market hard. Finding a good midrange GPU was almost impossible, and the  ones you could find were being sold at 2-3x their MSRP by scalpers also trying to make a quick buck off of the surge.

Since then Cryptocurrency has dipped, and Ethererum went as low as $143 (July 16th).  A lot of people who thought they were going to get rich overnight saw their mining profits drop significantly, and eBay soon saw a flood of second hand GPUs, from scrapped systems. For those of us that believe in CryptoCurrency, and are in it for longer than just a quick turn around, this meant we could finally start getting a hold of GPUs again. Here is a picture of the stock issues that have been pretty common, along with the price hikes in GPUs, $279 card selling for over $700.


Even though I was able to finally secure 6x GTX 1060 GPUs, they are from 3 different manufacturers as most sits would not let you purchase more than 1 or 2 cards at a time. So I have a bit of a “Frankenstien” looking build, but they have mostly the same specs, so work well together. Now that I have all the hardware I need, we can start the building process. Stay tuned for the upcoming posts!