

Today we are taking a look at the ASUS ROG Zephyrus M16 Laptop. This is an upgrade to my previous laptop, the most excellent HP Sepctre x360 15t that I reviewed 2 years ago. Lets see how it stacks up, and find out if it will be a worthy replacement. If you would rather watch than read this review, scroll to the bottom and hit the YouTube link.

The 2022 version of the M16 is a refresh from the product released last year. The M16 has been updated with the more powerful and versatile Alder Lake Intel 12th gen CPU, and more capable and efficient RTX 3070ti. Aside from the expected spec bumps, a few of the more notable upgrades are improved chassis strength and an updated camera with IR for Windows Hello.

I have been using this laptop for just over 2 weeks, and am ready to provide my thoughts, impressions, and even hesitations for some users when considering this laptop.


When customers asked in the question section of the Best buy website how much RAM was actually soldered in to the motherboard, the response came back from an ASUS rep was 16 GB. The Asus product website also showed the same information. So many users purchase this laptop thinking it comes with 16 GB soldered in, and they can easily add another 16 or 32 GB dim. Turns out that was not the case, and there is only 8 GB soldered to the motherboard, and a separate removable 8 GB dim. Now this laptop is still upgradable to 40 GB of RAM total, but a lot of users were pissed about being mislead, and tanked the reviews because of it. So with that other way let's go ahead and move on to the specs.

This particular version I am reviewing today is currently available at Best Buy retailing for $2149. There are other configurations available from different retailers, at different pricing options, but at a high level this one comes with:

Intel 12th gen Alder Lake, up to Core i9-12900H, 6C+8c/20T. this is a mobile workstation class processor, so on paper this should be a pretty powerful laptop or desktop replacement

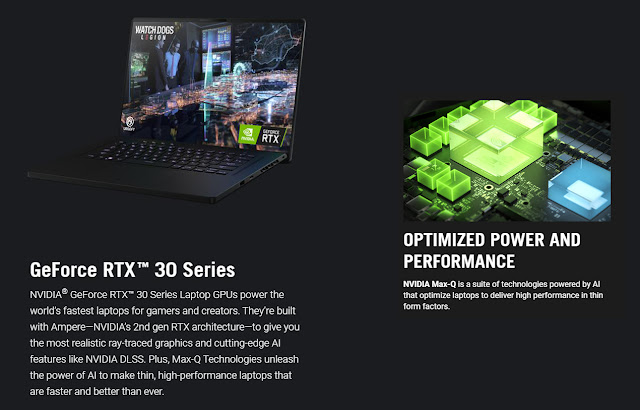
In addition to Intel’s UHD Graphics, we have a dedicated NVIDIA GeForce RTX 3070Ti with 8GB VRAM, supporting up to 120W with Dynamic Boost with the Hybrid MUX mode and Adaptive Sync (no GSync on Primary Display).

For the display with have a 16in, 16:10, Matte / Anti-Glare, IPS Panel, with a QHD resolution of 2560 x 1600 @ 165Hz.

16GB DDR5-4800 (8GB Soldered, 8GB Removable, up to 40GB total)
A 4-cell, 90Wh Battery, chargeable with both the 240 W power adapter + USB-C charging up to 100W PD


1TB SSD (2x M.2 PCI 4.0 x4 slots)
WiFi 6E 802.11ax (Intel AX211) 2×2, Bluetooth 5.2, and 2.5Gigabit LAN (Realtek RTL8125)\
Input wise we have a Single-zone RGB backlit keyboard, HD (720p) IR Webcam

Lots of port options here staring with the 3.5mm Combo Mic/Headphone Jack, 1x HDMI 2.0b, 2x USB-A 3.2, x1 USB 3.2 Type-C with DisplayPort & Power Delivery, 1x ThunderBolt 4, 1x RJ45 LAN, 1x MicroSD Reader


Size comes in at 13.98" x 9.57" x 0.78”in (35.5 x 24.3 x 1.99cm)
Laptop weight is 4.19 lbs (1.90 Kg), Power Brick 1.56 lbs (0.71 Kg)
6x Speakers with Dolby Atmos, Soft Touch matte rubber finish on Interior, Rainbow Prizm Lid


One thing to note, this year's version does NOT have the fingerprint reader built into the Power button like last year's version did, but Windows hello via IR Webcam is better and faster in my opinion, so no loss there.
Wtih specs out of the way, lets take a look at what comes in the box, and the exterior of this Laptop. In the box we have a pretty minimal load out. Laptop, Power Brick, and a bit of documentation. For a 16in screen, this laptop has a very compact profile, with tiny bezels all the way around the display, but still enough room for a webcam and microphone.

The screen to body ratio is excellent, but there are a few drawbacks
First the LED indicators reflect onto the screen. This is really only an issue in low light situations, but it is noticeable. Because of the design, hot air from the exhaust vents blows directly onto the display. We will go over the specifics of this a bit later. The Material on the has a black matte rubberized texture, looks and feels great… but as is expected, is a fingerprint magnet.
The lid has a ErgoLift hinge that allows for more airflow for the fans as it pushes up the laptop. This can be opened with 1 hand, and can go back a full 180 degrees.

The lid also features a reflective rainbow prism look wherein the colors shift depending on how the light hits it. Pretty cool.
The rubber feet on the bottom give nice stability, and there are no sharp edges to bother your wrists while resting on the laptop. At 4.19 lbs its not the lightest of laptops, but not horrible especially considering the power this brings to the table. All that power and the excellent 16:10 display comes in at a max thickness of 0.78in
As far as IO is considered, it pretty much has everything you would need. The one exception would be replacing the MicroSD card reader with a full size one.

Most of the ports are all located on the left side, making it tight at times, but as the majority of people are right handed, I assume this was done to eliminate cords hitting your mouse on the right. Lots of display options here with The HDMI, USB C, and Thunderbolt ports.
Charging at the full 240w happens via the 6mm barrel plug, and as mentioned earlier you can also charge using USB C Power Delivery up to 100w.
The Keyboard feels great, has good travel, and is very comfortable to type on while being fairly quiet.

Its a minimalist design with dedicated Media Keys on the upper left, function keys along the top, and your Home, End, PgUp, PgDn keys tied to the Arrow Keys on the bottom right.

There is no dedicated Print Screen button, but you can use FN+F6 to launch the Snipping tool. The single zone RGB backlight can be configured in the Armoury Crate application, and there are also hotkeys to quickly modify the brightness levels. The large glass trackpad comes with precision drivers. Its smooth, accurate, and a great size. Feels solid, and is one of the better clickpads I have used.
Now on to the Display. As mentioned we have a great 16in matte screen with a QHD Resolution of 2600x1600. The panel operates at 165Hz when plugged in, but can drop down to 60Hz when on battery to save power, which is why the screen will flicker if you unplug the power cable while the laptop is on.

The screen has a nice peak brightness of 500-nits and claims 100% DCI-p3 color coverage.
The lowest brightness level is still pretty bright, but other than that I have no complaints about the display, and its one of the best I have seen on a laptop. No stuck pixels to report here.
The audio system has a total of 6 speakers, with 2 woofers on the bottom and 4 tweeters that fire through the grills around the keyboard. Sound quality is excellent, and it does get fairly loud. Not rattling can be heard in the keys even at the highest volume levels. Overall one of the better speaker configurations I have heard on a laptop.

The webcam is a welcome addition as some ASUS laptops don’t have them, which seems like a horrible idea. Its only a 720p camera, but quality is adequate for web calls as long as room lighting isn’t too poor.
IR cameras are present for fast Windows Hello login. I didn’t play around much with the microphone options, but as is, they sound pretty good for a laptop.
Now Lets take a look at the guts of this laptop. Taking the bottom panel off this laptop is very simple and its one of the easiest laptops to disassemble I have come across. Screws are standard Philips head, only only 3 of them are covered by easily removable rubber caps. Inside you will find the cooling components, WIFI module, 90w battery, audio system, and the 2x SSD and single RAM slot.

Performance & Gaming
Quick note on Laptop performance settings. The M16 comes with a few preset power profiles. These all work as intended, but do NOT mess with power settings in the Windows Settings, only modify them via Armoury Crate. I did the latter, and it seriously screwed performance up, creating horrible lag doing simple things like opening the file browser. Gaming was impossible. Ended up having to wipe the laptop and start over. Stick with Armoury Crate settings and you will be fine.
Now lets go over the 4 power profiles you have available. They are
- Silent, runs quiet with the fans under 35db, but with limited CPU & GPU power. CPU 35w. The CPU will run at about 70-80% of its full capacity, but the GPU is aggressively underclocked and ends up being about 50% of its maximum performance. Great compromise for general everyday computing tasks.
- Performance is a balanced profile with close to stock CPU & GPU clocks. Fan noise goes up to around 45db, and a combined CPU+GPU power package of 110w, with the CPU hitting 65w. CPU and GPU performance both take about a 15-20% hit in this mode.
- Turbo is a high performance profile with increased power and clock speeds. GPU gets an overclock bump of +50 MHz on the Core and +100 MHz Memory. Combined Power package of 140w, CPU maxing at 90W. Performance is great, but at the cost of fan noise, 55db.
- Manual Adjustment allows you to further tweak the settings and power levels to your liking, and create custom Fan curves based on Temps.
So with these profiles, here is what to expect. Turbo is a performance beast but only available when plugged into the power brick. (Note that although this laptop will charge over USB C, you only get access to Turbo with the 240w Power Brick). Great when you want to encode videos or get max FPS on games, but you will want headphones while using this mode. Performance will be your “daily driver” offering a good mix of performance and noise. And silent will sip a bit lighter on your battery, keeping things very quiet in the process, but not good for much more than web or file browsing.
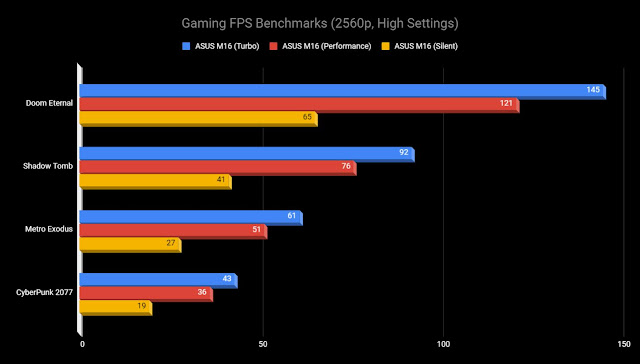
On to the performance numbers. I’m not going to go into a ton of detail here, but will show a few graphs showcasing performance metrics. All of these tests were run on the “Turbo” profile for max performance.
BENCHMARKS
CPU (Synthetics)


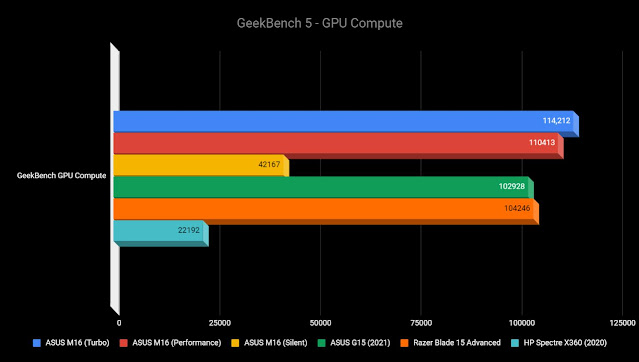
Now for more gaming focused benchmarks lest start with UNIGINE’s SuperPosition

And not some more Gaming Centric Benchmarks



TEMPS
The i9-12900H will level out around 90w on Turbo and 3.2GHz on the P Cores, with temperatures around 93C. Turbo pretty much maxes out the fan RPM, so not going to get any cooler here when stressing the CPU.

Performance will see temps in the high 80s, and Silent will keep things in the low 70s. Note that if on battery power, the CPU drops to only 40w on Performance Mode. GPU on Turbo will pull around 115w on some test and games, but most saw it around 105W, hitting low 80s in these tests. Performance mode drops the wattage to around 80w, and keeps temps to the Low 70s. Silent hovers in the high 60s
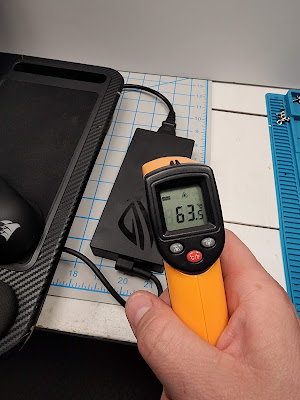
External Temps were toasty, but the laptop surface or keyboard was never uncomfortable to the touch.
Didn’t hit any thermal throttling on this device, which seemed to be an issue I ran into a lot with my previous HP Spectre.
Bottom near trackpad
27c
Keyboard
48c
Top near hinge
55c

Under Laptop
50c
Power Brick
64c
Fan Noise
To keep temps from getting out of hand, this laptop has some pretty impressive cooling. ASUS refers to this as “Intelligent Cooling, and combines using Thermal Grizzly Liquid Metal thermal compound, with 6 heatpies, and what they refer to as Arc Flow 84 blade fans. So lets look at some numbers, and some sound samples from the fans at each power profile.

When in Silent Mode, doing general computing tasks such as web browsing, the fans aren’t audible above ambient room noise, which for me was 37db. When gaming fans kicked up to 44db.
Performance kicks it up to 39 dbs for general computing and up to 55 dbs when gaming.
And with Tubo even when sitting idle we get a 52 db, and when stressed a very loud 63db.

Needless to say, in order to keep this high performing hardware adequately cooled on the higher performance profiles, you are going to have to live with some fan noise, so bust out the headphones. But Silent mode is still very capable and keeps things nice and quiet for the majority of daily computing needs.
Battery Life
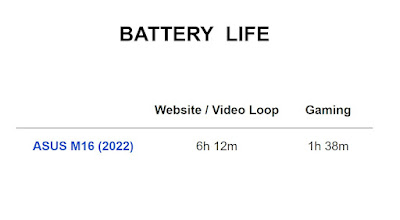
In Silent, you can get almost 10 hrs of general computing. The data above is in Performance Mode, not super efficient, you can still pretty easily get more than half a workday before having to plug in, especially in the lower power modes.
Final Remarks
For its physical size, the M16 packs an amazing screen, and incredible performance, along with a solid array of IO and connectivity. The 16:10 QHD display with 500-nits brightness is one of its major selling points.
Performance wise, this laptop can be a beast as long as you are ok with the loud fans when needed. Both Performance and Slient modes offer a good balance of noise and performance, and will probably be the profiles most users will enable 90% of the time while using this laptop. But if you need extreme performance, Turbo mode is there.
I hoped for a bit better battery life, but as this isn’t a “thin and light” ultrabook, really wasn’t expecting much more than what we see in this hardware configuration.
Overall, you get an amazing hardware combo, good keyboard and speakers, and a bright 16in screen, all in the body of a 15in laptop that is less than 1in in thickness. It can be hot, it can be loud, but only when you need that extra performance bump. Overall, this is Laptop is best in class, and I am excited to have it as my new daily driver.
Well, that's it for this one. If there is something I didn’t cover that you would like to know, hit me up in the comments. And as always, thanks for watching!
YouTube Video Link: https://youtu.be/A5iAKGRAYLk


