Thursday, September 27, 2012

I Sprung a LEAK

Just wanted to post a mini-update, along with some crappy findings...
I finished wiring all my fan extensions that I will be using with my fans and the controllers. All have been cut to the exact length, sleeved, tested and work great.


I also decided to post a picture of some of my wiring diagrams that I have done up to help me keep my thoughts straight while making my own cables. Shows how I wired illuminated vandal switches, my light panel, led strip, reservoir LEDs, and fan extensions along with RPM reducers which I may use on the fans not attached to radiators.


So with everything wired up, I decided to do a leak test. Everything was looking great untill... LEAK!! And not just a leak requiring a tightening of a fitting, it was a leak in the seam of my XSPC reservoir.


To add insult to injury, I pulled the res out, and had it sitting on my work bench. My son came in behind me, and managed to pull it onto the cement floor, further cracking the unit. 
I was able to put it back together with my liquid acrylic cement, and fill the seam. Also ran an additional leak test with just the res to see what would happen.


It seemed to fix the leak, but at this point, I am going to toss this reservoir, since I can't really trust it for long term use. New one should arrive any day now.

Wednesday, September 26, 2012

Project Bright Panel: New Corsair "Air Series" Fans

My most gracious hardware sponsor Corsair, sent me the final components to finish up my build. This week I received a bundle-o-fans.  These are their new line of "Air Series" fans, and they look great.  There area verity of types, but they gave me the AF Quite Editions for case fans, and the SP series for my radiators.  Here is the list of what came in:

Radiator Fans (120mm) - SP120s (High Performance Edition) x7
Rear Exhaust (120mm) - AF120 (Quiet Edition) x1
HDD Bay (140mm) - AF140 (Quiet Edition) x1

 
 I really dig the changeable color rings on the fans.  It should look good with my black/blue theme.  Each fan also comes with an adapter that will step down the voltage and manually slow down the RPMs.  Nice that its included, but I will be counting on the Link or AquaComputer for that duty.  The blades on the two types of fans are also different.  The high pressure fans "SP Series" have blades specifically made to push more air through a radiator.  The few reviews I have seen speak highly of them, so I am excited to get them installed.


I have to admit, the extra color highlights they bring the the build are right up my alley.


I did a bit of testing with the new Corsair SP120s against my previous fans, the CoolerMaster Blue LED Silent Fan 120mm (R4-L2R-20CK-GP). Specs on both are as follows.

Corsair SP120:
RPM 2,350
CFM 62
Noise 35dBA

CoolerMaster R4:
RPM 2,000
CFM 90
Noise 19dBA

I actually shot a video of the test, but apparently I was an idiot and shot it upside down with my phone  So here is a screen cap of the test. Used a basic fan controller, a Decibel Meter on my phone (not super accurate), and a simple "blow test" with a piece of paper about 6in in front of the fan. Keep in mind, this is a very un-scientific method of testing these fans, and the Corsair SP fans are made to work better with static pressure that comes with being attached to radiators than just blowing power, but since I have no way to measure that, I did what I could.


At 2,000 RPM, the Corsair SP120 had noticeably more "blowing" power than the CM fan, and was measured at around 43dBA. Again, this could be way off, but its what the meter said. The CM fan at this same speed had less power, and was louder at 48dBA... much higher than its specification of 19dBA.

Two other observations.

1) With the SP120 cranked all the way up to 2,350RPM, it was at the same noise level of the CM fan (when at 2,000RPM), but much more powerful.

2) When I brought the SP120 down to around 1,500RPM, it was barley audible. This was reassuring being that with a good fan controller, for basic computing (web browsing, movies, etc) the majority of the time the fans will be at a noise threshold that wouldn't bother the average individual.

So all I can really say about these Corsair fans at this point is that they are more powerful, and more quiet than my previous fans, and better looking. So I keep them!

After my very rudimentary testing of the fans I own, I came across a much better review that used big expensive equipment, and has Charts / Graphs! I am an Excel monkey being in the Finance field, so I sometimes get overexcited about that kind of stuff

The video review can be found here:

Corsair AF & SP Series Computer Case Cooling Fans Review

And here are the juicy details. So it look like when comparing static pressure, which is what the SP120s are supposed to be made for, they in fact perform VERY well. The only thing the chart does not show is what RPM these fans are running at, but it still paints a pretty positive picture for using the SP series fans with radiators.


Turns out the Decibel Meter on my phone may not be that far off. At full RPM, I was reading around 48dBA, which is what their results were as well.   Next step is for me to hook up my various "Smart" fan/system controllers to see which will work better with all the different fans and pumps in my build. Stay tuned.

Tuesday, September 18, 2012

Project Bright Panel: Sleeving Completed

MNPCTECH finally has their MOD Ruler / Gauge back in stock, and mine came in this week.  Pretty sweet little modding tool, but I won't have a chance to use it this time around since I am wrapping up the build.  But since I can't seem to go more than 6 months without modding / upgrading something, it will get plenty of future use.


All major sleeving is now complete.  All I have left on the build is to connect all my fans an pumps to the AquaComputer / Corsair Link, and finish my tubing runs. 

I know for sure that I will be using a two (2)  AquaComputer USB PowerAdjusts to control my pumps, since they operate independently from other monitoring component.  I will be testing the Aquero 5 and Corsair Link separately to see which will end up in my system long term to control my fans.

I still have to secure some of the cable runs to the back of the case with my cable clamps from MDPC, but here is a basic shot of all the major cables connected.  Also in the pic is the SATA Power cable that I connected to the Hot Swap plate.  It was very easy to sleeve, but a pain to get the actual wire to go in the connector.  Ended up using a hammer to "tap" the two parts of the connector together.


I pretty much have everything set up now to start playing with both the AquaComputer Aquero5 and the Corsair Link.  Just finished making my cables for, and sleeving the Poweradjust USB 2 pump controllers.  I will be using them independently from the other control/monitoring units. From what I have seen from other users online, both the Aquaero5 and Link have a lot of capabilities.  It just going to come down to which fits my needs the best.

Along with the Poweradjust USB 2, here is a shot of the 5mm Blue LEDs I just wired and sleeved, and a preview of how they will look inside the res.  No liquid yet.


Once I decide on which control unit to stick with, I can finish the cable management up no the back of the case.  Even with using MDPC sleeving on all of my cables, there are still A LOT of cables to deal with.  I don't know if it will look as clean & tidy as I originally envisioned it, but already it is a huge improvement over the spaghetti wire mess that used to abide back there.

Monday, September 17, 2012

Project Bright Panel: New Sponsor & Components

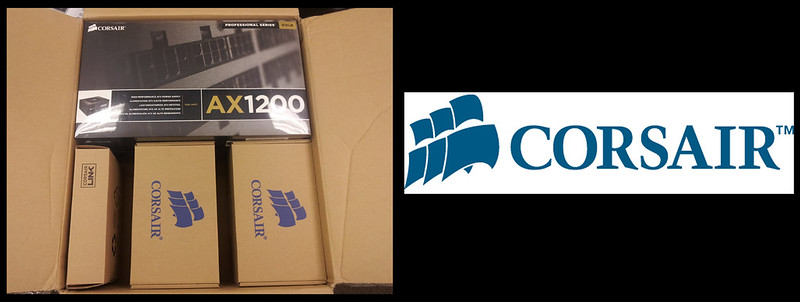
I am very pleased (and grateful) to announce that Corsair has decided to help me out this with build by supplying me with an AX1200 PSU, Sleeved Black Cables, and a Corsair Link Temp Control & Lighting Kit.  I was surprised when I got the news of a sponsorship from Corsair, but will gladly use their great products in this build.  Thanks Corsair!


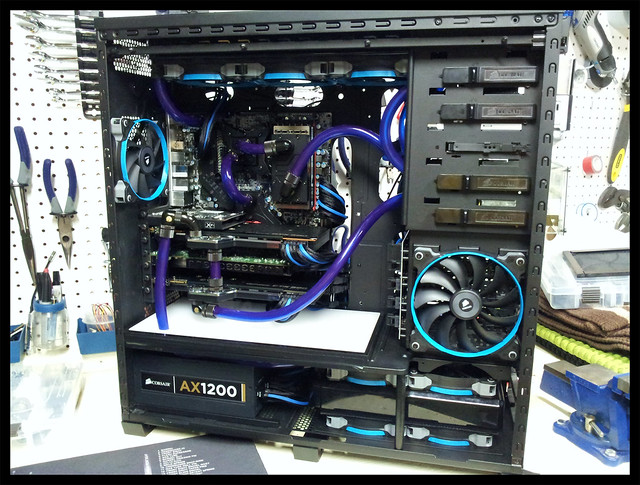
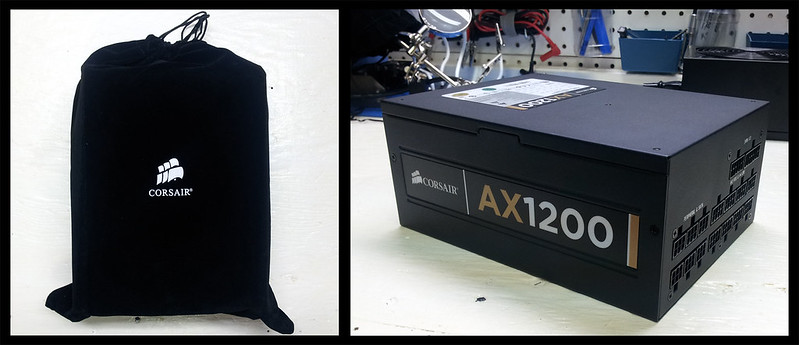
Here are some beauty shots of the AX1200 that just arrived. I was previously rocking a 1000w Silverstone PSU, but was getting close to the top end of its range (hitting 970-980w) when benchmarking with everything OC’d.  The extra 200w will come in very handy, especially if I ever go Tri-SLI.  The pouch the PSU came in was a soft suede material.  The overall packaging was of high quality, and of course the PSU itself looks great in the 800D.


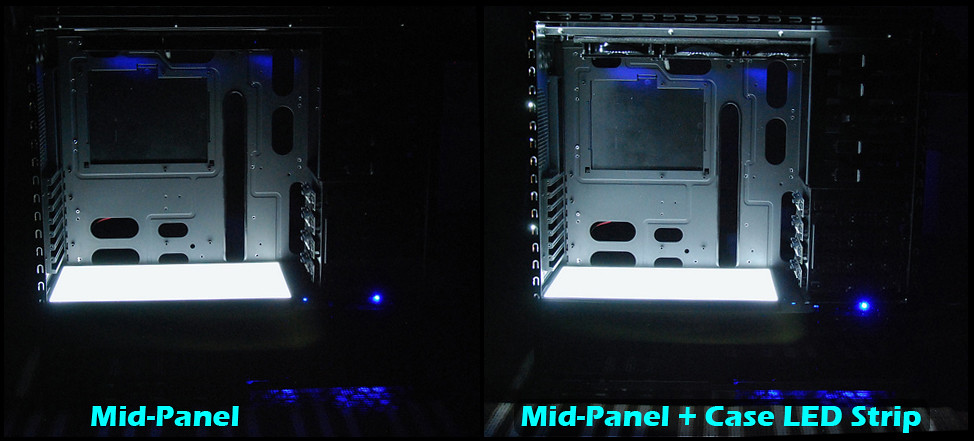
Here is the full Corsair Link Kit that includes the Temp Monitor / Fan Control, and the LED lighting component.  I’m not sure if I will be able to use the LED strip this go around, as I have already installed one in this build.  But I like the fact that is so customizable using the Corsair Software, and since its an RGB LED strip, the colors can change based on usage (gaming mode), or vary based on system temps.  I am going to run the Link and the Aquero 5 to see which one better suites my needs with this specific build.


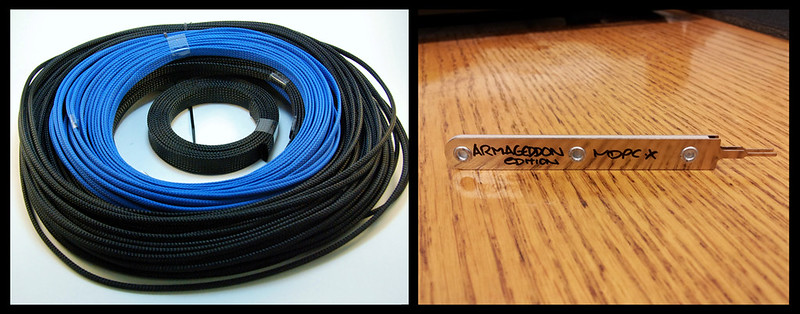
On the right is a Set of Black Sleeved cables for the AX1200 from Corsair.  I had already decided to sleeve my own cables this go around, but will be using the “guts” from these for my custom cut lengths.

I have to admit, these sleeved cable packages made by Corsair for their PSUs are a great value proposition.  If someone just wants one specific color of sleeved cables, these are a great deal, especially when you factor in the cost of sleeving materials, and the time involved to sleeve and entire set of cables yourself.  The connectors are also of high quality (although different layout than standard PSU connectors, more on that later), and the sleeving material is a tad thinner than the MDPC variants, possibly making things a bit easier when trying to manage your cable clutter.  Overall for may individuals, these cable kits are a great buy.

But… not everyone will want these types of kits.  I can see three main reasons why these would not be for everyone.

  • Perfectionists will notice that the heat shrink tubing is not even lengths across the connectors.  For those going for looks / beauty, that could be a turn off. 
  • Custom Cable Lengths can make cable management a lot easier.  I for one have decided to go that route for this build, but in all fairness I did still use these cables, simply cutting them to my preferred length, re-crimping one side of the cables, and resleeving with MDPC sleeve.
  • Custom Color selections.  Right now these kits seem only to be available in solid colors.  Many sleevers like to use multiple colors in their strands.  I am using 2 colors in this build (black & blue), hence the need for me to resleeve these cables once I had cut them down as stated above.

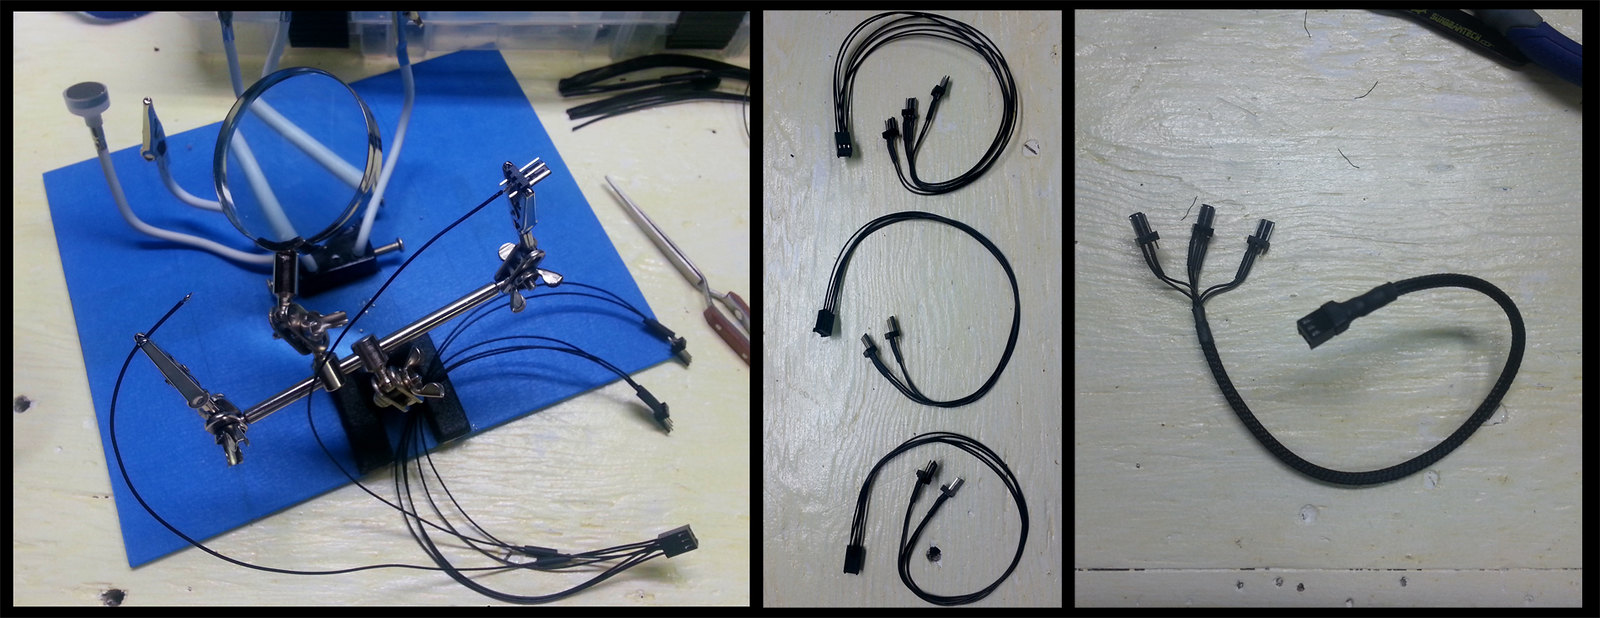
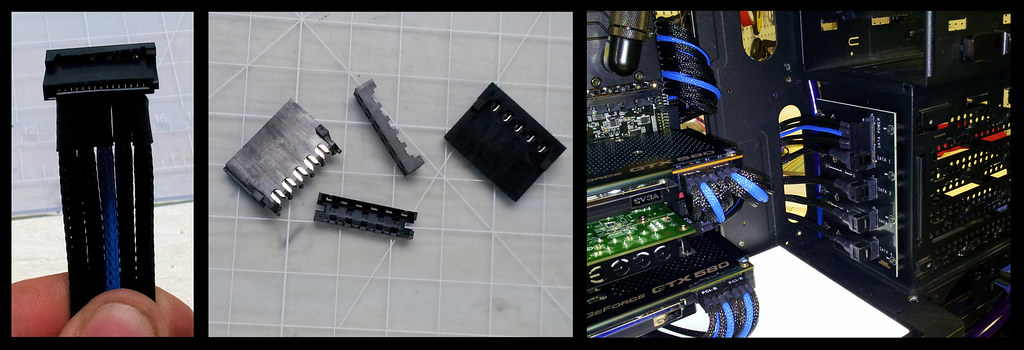
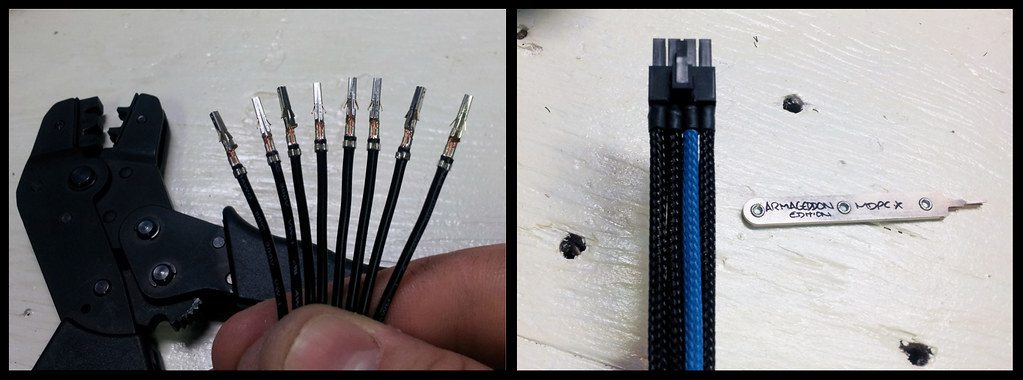
So for some, these sleeved kits by Corsair are great time savers and can fit a specific need (single color)  very well. For others of a more DYI nature (or OCD / Perfectionists), they will be better off making their own sleeved cables.  To the left below is a close-up of a few of the connections from the kit.


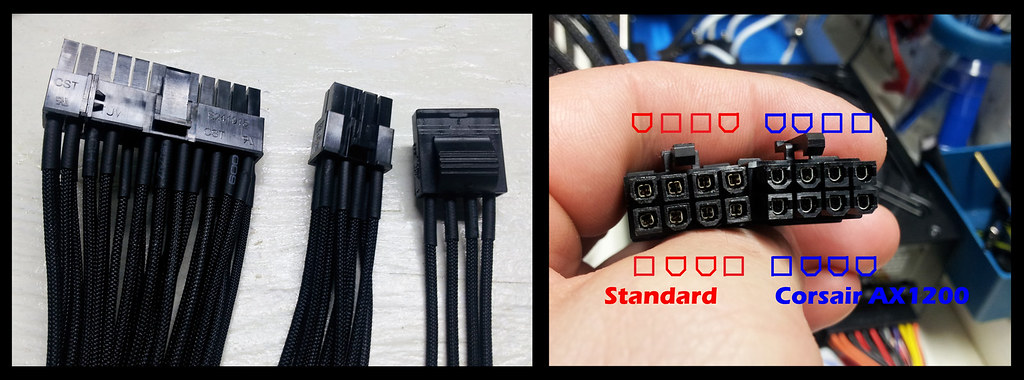
 Above right is a picture comparing the connector for an 8-pin CPU Power connection.  This is the side that plugs directly into the PSU.  This was not a problem, but something I just found to be interesting.  The AX1200 has a different connector layout compared to a standard 8-pin CPU connection, as can be seen in the above diagram comparing the two.  I had already completed an 8-pin sleeved set before the PSU arrived, only to find out it wouldn’t plug in.  Luckily with the MDPC Pin remover, I was able to switch out to the one that comes with the AX1200 in just a few minutes.  All is well.


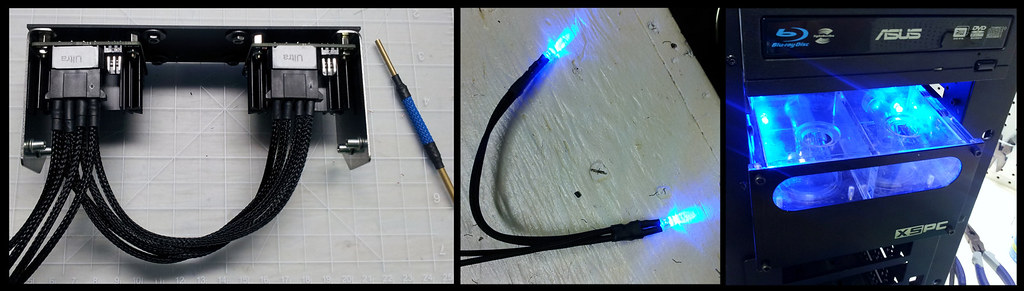
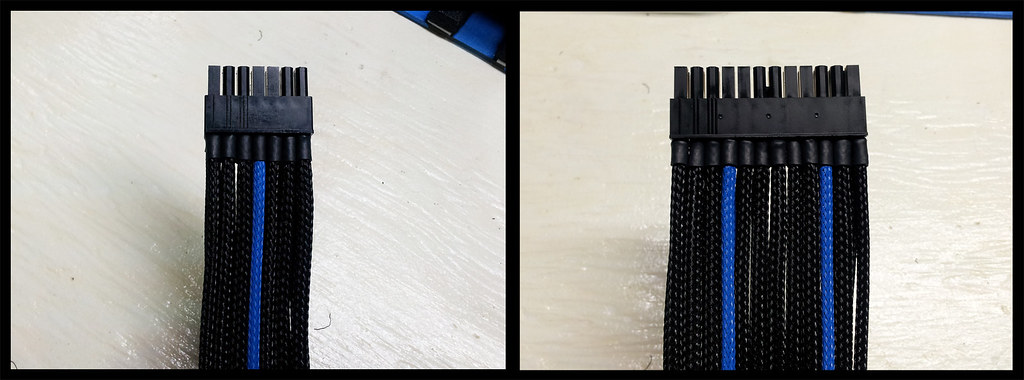
 And here is my completed 24pin Cable/Connector.  The AX1200 has the 24pin cable split into two connectors where it plugs into the PSU.  The pic on the left is one of those two connectors.  Not perfect compared to sets from the “Pros” that I have seen, but it is getting easier each time, and my results are improving bit by bit.  Even with it getting easier (and faster)…  I have found that sleeving still takes a LONG time if done correctly.

Project Bright Panel: SATA Cable Sleeving

I worked on sleeving my SATA Data last week, but ran into a bit of a hiccup.  Two of my 5 cables have both right angle ends.  It is near impossible to get the shrink tube over those ends, so I was only able to sleeve the SATA cablest that had a least one straight connection.


I ordered some new cables from Newegg that can be sleeved property.  Ended up getting some round SATA cables for easier cable management.  They arrived Friday along with some other components. 

And just a word of advise to anyone that wanting to sleeve their SATA cables... I had to stretch out my shrink tubing (a lot) for it to go over the connection heads.  Otherwise it is VERY difficult to get them over.  Maybe it is just the brand of cables I am using, but it seemed much more difficult than it should have been.

Finally got around to sleeving my new Round SATA Cables.  The look great and are a bit easier to bend.  Also went ahead and sleeved the motherboard header pins along with the USB header from the front panel.


I ran into a bit of a problem when trying to plug the cables into the mobo with the heat-shrink tubing installed.  They were a bit more stiff than normal, making them difficult to bend, and adding a bit too much stress for my liking in the SATA port.  So I ended up using my heat gun again on the areas that had the shrink tube making it nice and hot.  While still pliable, I inserted the SATA Cables into the Motherboard, and allowed them to cool with the exact bend angles that I wanted.  Now they fit perfectly without any undue stress on the ports.


I now have everything I need to finish sleeving the rig. Will update with more pics soon.

Thursday, September 13, 2012

Project Bright Panel: Panel Construction & Sleeving

I decided to provide more clarification on how I built the illuminated mid panel.  So here is a "cut-away" view of the light box I constructed that sits atop the mid panel.  


There are many other ways to go about doing this, but after some experimenting with different materials, and thickness, this is what turned out the best for my needs.  Hopefully this along with the close up pictures I have posted, will clear up any other questions that still may be floating about.

In addition to the cut away view of the illuminated mid panel above, I have uploaded my SketchUp modle to the 3D Warehouse.  It shows an assembled view, along with an exploded view of the panel.  Dimensions are inches because that is what my local plastics shop required to make the cuts.  It can be downloaded here.


I have also made available my 3D Modle for the Swiftech Apogee HD CPU block.  Get it here.  There are other waterblocks on the 3D Warehouse, but I couldn't find any for the newer Apogee HD, so I made it.


Sleeving

I knew it would take a while to make my own custom length cables (for better cable management), and then sleeve them... but I had no idea my fingers would get so abused in the process.  Stretching out the sleeving material over and over again to get it nice and tight over the wires has taken its toll, especially on the ends of my thumbs.   Too bad the large calluses on my hands from weight lifting don't extent to the tips of my fingers and thumb.  Going to take a break for a day or two and finish my tubing runs.

But a little discomfort is well worth it to get good looking sleeved cables.  Not too shabby for my first attempt using MDPC materials.  I also want to say that the MDPC Crimping tool is worth its weight in gold!  Such a great crimping tool compared to others I have used.  Perfect crimps every time! :D


Here is a small update on the case.  I spent a bit of time working on my tubing runs to give my fingers a break from sleeving.  Not complete yet, but this will give somewhat of a preview of the look I am going for. 
***I no longer plan on using the blue tubing.  I will be using clear, but until it arrives, I am checking lengths with what I already have on hand.

Tuesday, September 11, 2012

Project Bright Panel: Component P0rn


Still waiting on a few fittings to arrive, and have started making my custom length PSU cables.  Cables and sleeving will take a bit, so in the mean time, here are some nice shots of most of the components going into this build.

EVGA GTX580 HydroCopper 2 - 2X for SLI

Some of the Bitspower Black fittings I will be using, and the Primoflex Blue tubing.
Here are the AquaComputer USB PowerAdjust 2 Ultras that I will be using to control pump speed.  The Ultra version can control speed based off of liquid temps, so it should be a nice addition, and keep pump noise to a minimum until faster speeds are needed.


Here we have the AquaComputer Aquaero 5 LT.  Pretty powerful monitoring and fan control too.  I may end up using something different to control all of the fans in my system, but as of right now, this guy is it.  The USB PowerAdjusts operate independently from the Aquaero, so you can kind of mix and match to fit your exact needs.


Here is my Primary OS SSD, and Intel X-25m 160GB.  Not the fastest on the block anymore, but still a really good and reliable SSD.  I have 3 other HDDs in this build, but didn't deem it necessary to take pics of them.  Also have my Creative X-Fi Titanium Fatal1ty Edition.  I use the Optical Output to power my Logitech Z-5500 speaker setup.  Sounds great.


Here are some EK Waterblocks that I will be using.  One of the left is for my X58 motherboard Chipset and VREGs.  The other is a RAM block for my Corsair Dominator sets.


Before and After shots of the RAM block.  Noting too special, but I like Before / After shots :D


And here is my motherboard with blocks installed, along with the Swiftech Apogee HD that I will be using.  Really nice looking block, and I am glad it comes all black.  Saves me from having to paint it like I have done previous blocks.


Monday, September 10, 2012

Project Bright Panel: Sleeving Tools

Spent a bit of time getting my fittings and sleeving materials organized for easier access. I am waiting on one more component to arrive, then I will hammer down on sleeving some custom sized PSU cables.

 
Also set up all the tools I will need to complete my cables. I was a bit hesitant on buying the crimping tool from MDPC since it was more expensive than what I can find locally. But after actually crimping a few terminals, it runs circles around my old crimping tool. Very glad I went with this one, as it will probably help the sleeving process go faster.


I plan on mounting the Motherboad tonight so that I can get exact measurements on cable length, allowing me to finally start the sleeving process. I have never attempted to sleeve anything with the quality of materials provided from MDPC-X, so I'm pretty excited to see how it turns out.

Project Bright Panel: My "Helper"

My 2yr old is a button freak. I caught him red handed last nigh turning my mid panel on and off over, and over again. Those illuminated vandal switches are just too much temptation for him. I'm glad his older sister doesn't share his love of button pressing.


Looks like I need to put the case up high until this build is done, at which time I can move it into the office (which has a locked door).

Project Bright Panel: Sleeving Materials

All my sleeving materials finally arrived from Nils over at MDPC-X. It arrived in 3 different packages, and it looks like very good quality stuff!


I am going with primarily Black sleeve with a few Royal Blue highlights. Also making all custom power cables so the lengths with be perfect, and allow for better cable management.


Sleeving is going to take a while, so I will post some other pics of components and such during the process.

Friday, September 7, 2012

Project Bright Panel: Illuminated Mid-Panel Construction

I have always been envious of the lighting methods used on the MurderMods and Million Dollar PC. Most of the guides explaining how to build one used Electroluminescent panels, which I could not find in the right size (or for a reasonable price) here in the US. So I set out to build my own using acrylic panels and a white LED light strip. Just like my initial case layout, I built my "mock-up" in SketchUp.

 Here we have my 3 panels I will be using. I used 1x Mirrored Acrylic, 1x Clear Acrylic, and 1x White Acrylic. They will be constructed in that order, with an LED strip on the sides "shooting" light inwards. The housing will be a box made of Black Acrylic. The hole will be where some of my tubing will pass through. Once the whole was drilled, I polished the sides to allow for better light transmission on the clear and white panels.


On the left is a pic of the completed box, with the bottom mirrored layer installed. To the right is the light strip I used for my build. Purchased it off of Amazon for a really good price. It is very bright, and easy to work with.


Just an idea of how the light strip will adhere to the box, on top of the mirrored acrylic. Also shown is the end of the light strip, where I cut it, and soldered on the contact points. It can be powered by any 12v source, and requires only 25w to light the entire strip. So I am able to power both the internal case strip and my mid panel with just one 4-pin molex connection.


Here is the completed mid panel box. The clear layer sits between the mirrored and white acrylic panels. I did a bunch of tests and found that this "sandwich" combo provided the best light transmission. I first tried laing the white layer directly on top of the mirrored, but the light transmission was too weak. By using the clear in the middle, the light passes farther through the top panel, giving a brighter look. On the right is a circuit I am using that allows me to alter the brightness levels of both the LED Strip around the case perimeter, and the mid panel. It has 3 settings (High, Mid, Low), and works very well. Only downside is that in order to adjust it, I have to remove my case panel, but once I find my preferred brightness level, I probably won't touch it again. I installed it on the back of the CPU plate for easy access to the wiring for the Vandal switches.


Here we have the lighting install and running, with a comparison of brightness with the different parts turned on. I used my phone camera for these pics, so it looks much brigher and washed out than it does in person. Time to bust out the DSLR for some better quality pics, but I may wait until the final gallery pics once everything else is installed. Here we have both parts lit up, along with the lights in the room turned on.


And here we have the room lights turned off. One pic shows illumination with just the mid panel, the other combines the light from the LED strip that lines the interior of the case.


 Next up... sleeving and component p0rn :-D

Project Bright Panel: My Workspace, Case Modding, Vandal Switches

Got the workspace all set up and ready to go. Our storage room was a mess, so we spent the weekend cleaning and organizing everything. Added a pegboard wall for my tools. All my larger "Power Tools" stay out in the garage. I wanted this stuff in the storage room so I could work on my electronics (and clean my guns) in a semi dust free environment. *The purple tools on the right are my wife's. That side of the workbench is her sewing area. ;)


Case Cuts / Holes

I decided to remove all of the rubber grommets from the case, and enlarge a few of the cable management holes. Also drilled a few additional holes for cable management clamps. Here is everything before I took the Dremel Tool to it. I also modified the bottom of the case to accept a 2x120 Radiator. I had previously made some cuts down there, but wasn't too happy with the end result, so started over.


With this big hole on the bottom of the case now, I decided I needed a good solution for dust management. I made using acrylic and Silverston fan filters a custom dust filter to go on the bottom of the case. It secures to the case with magnets, and works great. It only shows 1 filter, but there are now 2 installed. Also showing a diagram here outlining what types of fasteners I used to secure the fans to the radiators, and radiators to the case. I found it strange that my top 120.3 Radiator uses SAE (6-32), but the bottom 120.2 Radiator uses Metric (M4-.7).


Here is a shot of my radiators with the fans installed. I did some minor sleeving, but didn't want to go through the hassle of actually disassembling the fans. The parts that are not black are hidden from view, so I am OK with how it turned out.


Here we have the opening on the bottom of the case for the 120.2 rad. I used a fan grill to help secure everything to the case, since some of the fastening holes were on the honeycomb grid of the case, and didn't tighten down as much as I would have liked. Picture to the left shows the magnetic fan filter installed over the opening. It is really easy to take off and put back on, and hopefully keeps my case dust bunny free.


Illuminated Vandal Switches

I decided to use some Illuminated Vandal Switches (Latching, 16mm), to toggle on/off both the LED Strip on the interior of the case, and the illuminated mid-panel. Here is a pic during the soldering process. Vandal switch in the death grip of my Octo Helping Hands setup. To the right is the completed switch, along with the resistor so I don't burn out the LED (470 Ohm, .3w, 5% tolerance), and my custom "Quick Disconnect" power connectors. I did end up sleeving it, but forgot to take a picture before I installed them. 


And here they are installed on the top of the case. The one to the left (Blue Ring), is the switch for the LED Strip along the outer edges of the case. The one to the right (Blue Dot), is the switch for the illuminated mid-panel. They turned out really well and work great. Only downside is my 2yr old is a button freak, and now tries to toggle them on/off every chance he gets.


 Next set of pics... Illuminated Mid-Panel construction.