Thursday, November 15, 2012

Project Bright Panel: Final Build Pics


Time to wrap this build log up. It has taken much longer than anticipated, but its finally done, turned out better than I had expected, and of course it also overclocks and performs like a champ. I am going to post a smaller version of each picture in the post, and below each picture, a link to a full size version of the image for those who want some close ups.


Here we have an angled side shot of the case with the window removed. Really pleased with how the colors of the liquid turned out, matching the Corsair fan rings.


Large Left Image
Large Right Image


Here we have another shot, directly from the side.


Large Left Image
Large Right Image


Shots with the windows installed. Looks great.


Large Left Image
Large Right Image


Here we have my attempt at cable management. I did what I could to keep it clean back there, but it was difficult to deal with that many cables, along with their added thickness due to the sleeving, which looks awesome by the way.


Large Left Image
Large Right Image


Here are some artsy fartsy close up shots :D I'm really not that great with a camera, but I wanted to try and get a few shots with my Nikon D80 of the build that were different from the usual side and angled ones we typically see.


Large Left Image
Large Right Image

Now on to the Workstation. Using a Dell 3011U as the main display, flanked by a 2007FP on each side for a total resolution of 4,960 x 1,600. I really like how everything works together, and all of that screen real estate is great for productivity... and of course gaming.

Large Image

Well... that's it! Time to put away the modding/build hat for a while, and enjoy my PC. Thanks to everyone for their support and input. If you guys have any questions for me, I am more than happy to help out. Thanks for looking.

Project Index

Monday, November 5, 2012

Project Bright Panel: New Primary Display

Uh oh... I may need to upgrade my graphics cards now after the newest edition to my workspace. :p Going from a resolution of 1920x1200 to 2560x1600 is going to put even more stress on my good ole 580s in SLI.

 
 I finally scored a Dell 3011U monitor! Been wanting a 30in panel for a while, and now my workspace / man cave is in my eyes complete. I will be flanking it with a Dell 2007FP Ultrasharp (1600x1200) on each side, rotated in portrait mode, giving me a semi 3D wrap-around effect with a total resolution of 4,960 x 1,600. :

I am still sorting through the last of the final pictures, and will be posting them all soon. Stay tuned!

Wednesday, October 17, 2012

Project Bright Panel: Battle of the Fan Controllers

Ok, it is review time.

Click on the link below to launch a YouTube video I made that shows both the hardware and software in action.

Video - Corsair Link Cooling & Lighting Kit Overview

I have two control systems that I have had a chance to play with for the last few days.  I will first post my review for the Corsair Link Cooling & Lighting Kit, followed by the AquaComputer Aquaero 5 LT.  Each contains a video walk-through showing the components and the software, followed by more detailed screen captures of the various setup screens of the software.  And here we go...


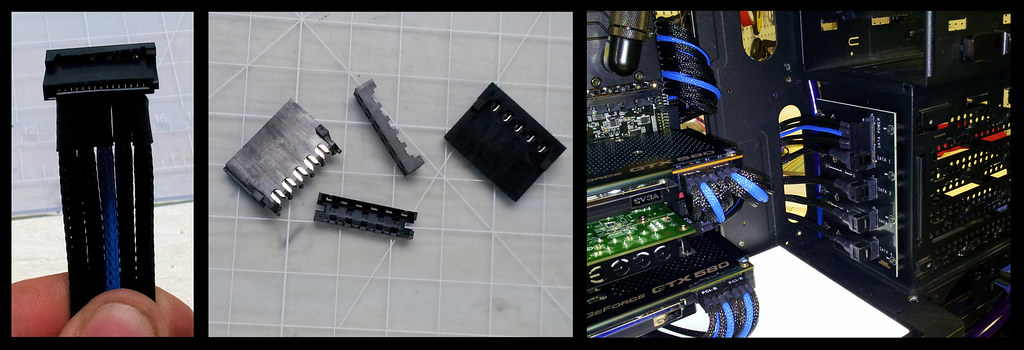
The Corsair Link Kit comes in to variants.  The Basic Cooling kit which comes will all that is necessary to control your fans.  Then there is the Cooling & Lighting kit which controls fans and comes with a Lighting Node which controls the RBG LED lighting strips.  
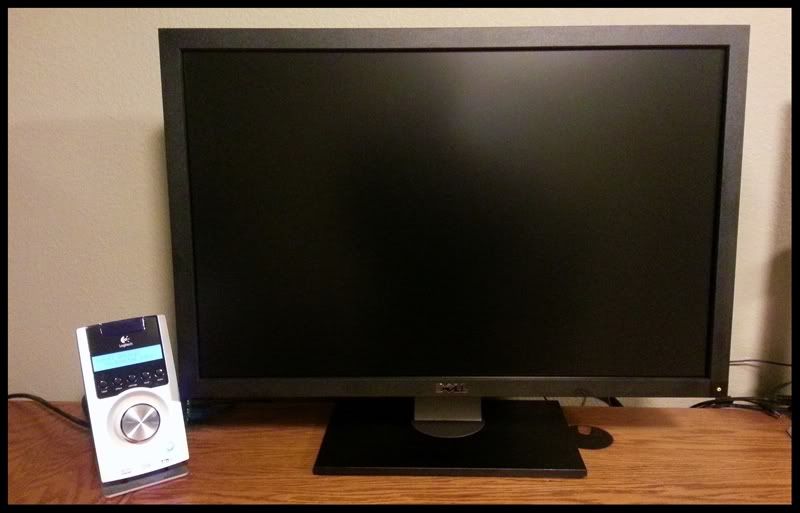
Both kits include one (1) Controller Node which has 5 fan connectors, and a few temperature sensor plugin locations.  Each fan channel can support up to 2 amps, and the node can support a maximum of 4 amps total across all channels.  That being said, if someone is wanting to control both fans, and a liquid cooling pump, they would most likely have to purchase a second Control Node as the single one would be quickly maxed out with multiple fans and pumps.

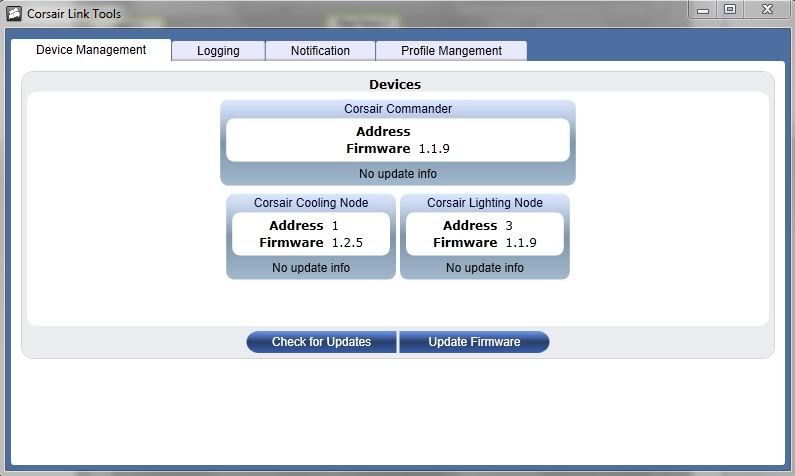
When first starting up the Corsiar Link Software, the first thing that needs to be done is update the firmware for the various components.  This was a necessary step for me because before the firmware update, my fans wouldn't change from spinning at 100% at all times.


Here is an overview of the various sensors and readings that can be seen within the software.  As shown in the above video, you can choose from a variety of computer cases and overlay the sensor data on top of your component locations.  Its is all drag and drop at this point, and you can also easily change the name of any sensor data shown on this screen for better customization.


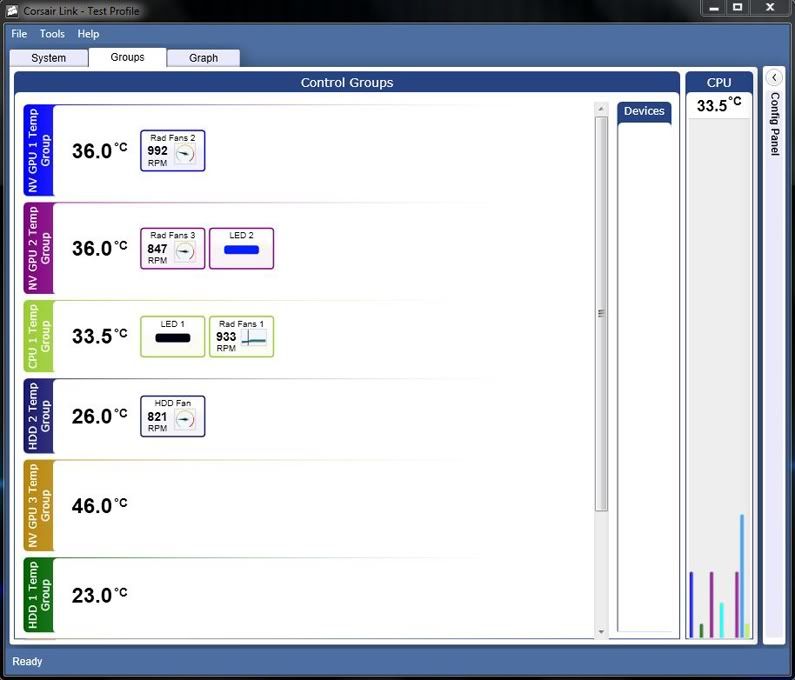
Next up we have the "Groups" screen.  This is where you make connections from sensor data to fan (or pump) control.  This is also drag and drop, and every easy to configure.


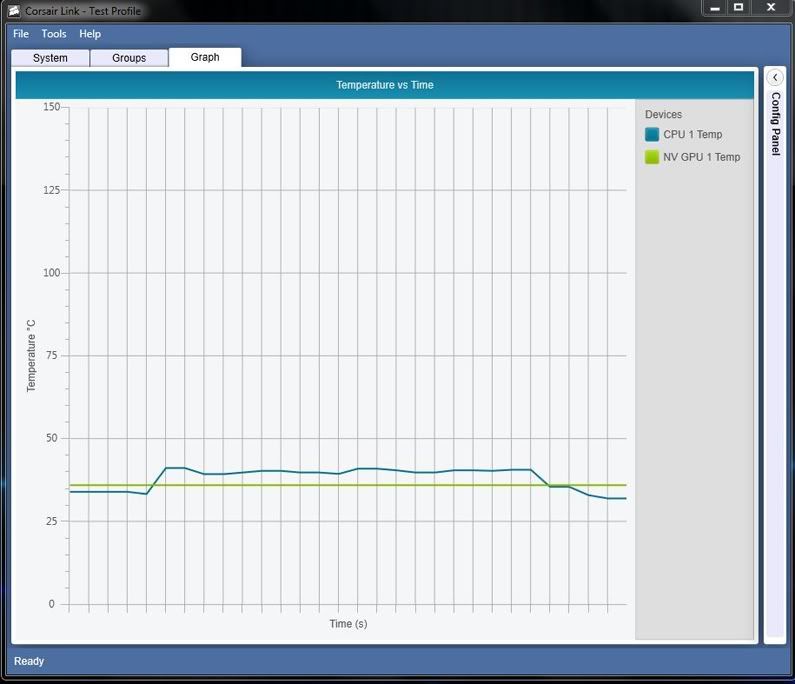
There is also a "Graphs" section that can show any of the sensor data listed on the Overview page.  It is very basic, and doesn't offer much as far as customization goes of colors or graph size.


Once all the grouping is set up between sensor data and fans, we can move on to taking more control of how the fans will operate in our system.  The first bank of options is shown below.  They are per-defined control curves, and the names are pretty self explanatory.  Below them are the "User Defined" settings including custom control curves.  These are easy to set up, and seem to work just fine.


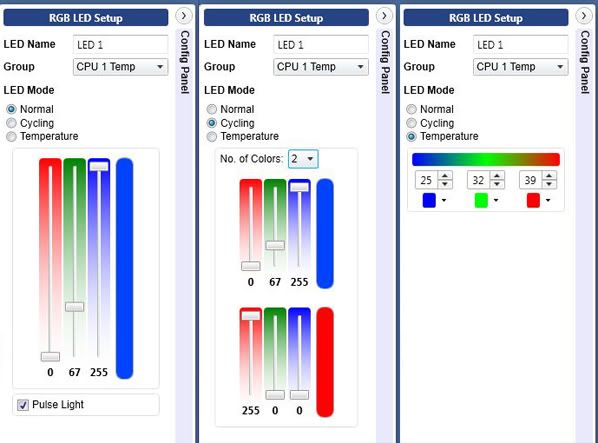
As mentioned earlier, I have the Link Kit with the Lighting Module, so I thought I would show the different LED configuration options.  More detail about these options and how they work can be seen in the above video.


Ok, so that is the Corsair Link Kit.  Very capable software.  Next up I will review the AuqaComputer system.


And now its time for a similar walk-through for the AquaComputer Aquaero 5 LT.


Click on the link below to launch a YouTube video I made that shows both the hardware and software in action.

Video - AquaComputer AqauSuite 2012, Aquaero 5, and PowerAdjust 2 Overview

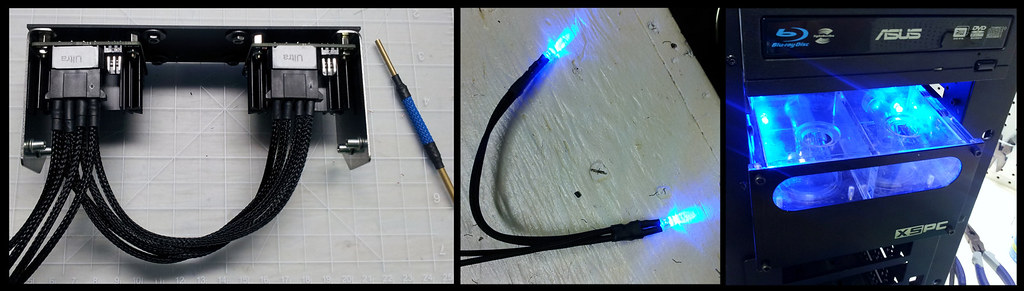
AquaComputers makes a variety of prodtucts that all communicate together via the Aquasuite software.  They have flow sensors, pumps, radiators, reservoirs, cpu blocks, etc.  I have the main controller unit, the Aquaero 5 LT, and two PowerAdjust 2 modules to control my MCP355 Pumps.

The Aqauero 5 can be pushed up to a maximum of 1.65 amps per channel (20 watts) or 5 amps total.  AquaComputer designed the output based on the temperature of the fan amps themselves to prevent damage.  The cooler you keep them the closer to 1.65 amps they will push.  For this reason, I installed a larger heatsink on my Aquaero, to keep things nice and cool and retain the ability to limit the RPMs as to keep things quiet when maximum performance isn't needed.

This will vary greatly depending on the fans you have, but 1.65amps is enough to run roughly 20x fans at 100%.  However, the load and heat increase as you dial down the RPM's so the real limit is probably closer to 12 - 15 fans, fewer if you use higher amperage units.  This is an amazing amount of fans to control off a single channel and is also enough juice to run a water pump such as the MCP355 or D5.

Even though it is possible to run a pump off one of the fan channels, it is better to use the Poweradjust 2 due to the high start up power draw of these pumps.  Each PowerAdjust2 also has a large heatsink to keep the unit cool when you lower the speed of the pump.  If you want to just run a pump at 100% all the time, you could probably just add it to one of the fan channels on the Aquaero 5.  But if you do a lot of power based throttling like me, it is better to use the Poweradjust 2  for the pumps, and keep the fans on the Aquaero just to be safe.  So, that is how I have set the hardware up.  Lets jump into the software now.

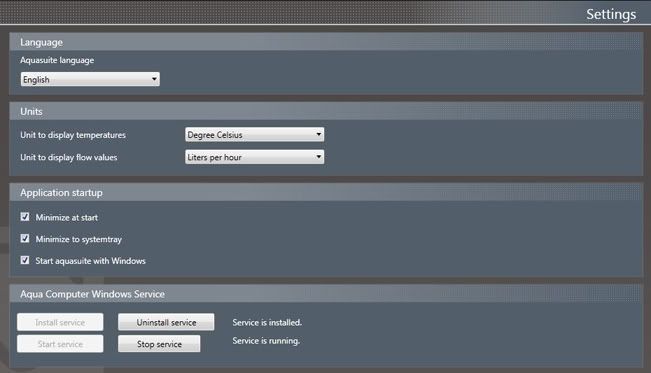
When first opening up AquaSuite 2012, go the the settings tab to set up your basic units, and language.  You can choose what units to use for temps, and flow measurements.  This is also where you configure the software's startup options.


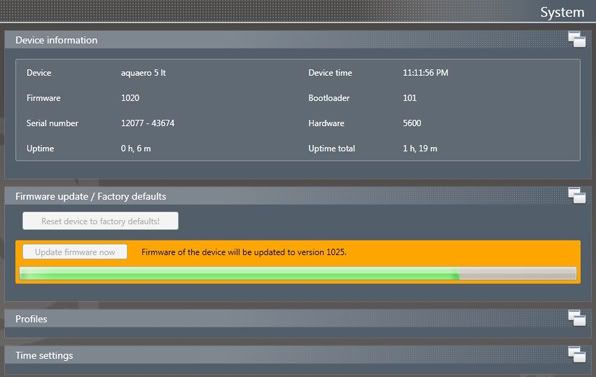
Next head over to the System tab to make sure you are running the most current firmware for your hardware components.


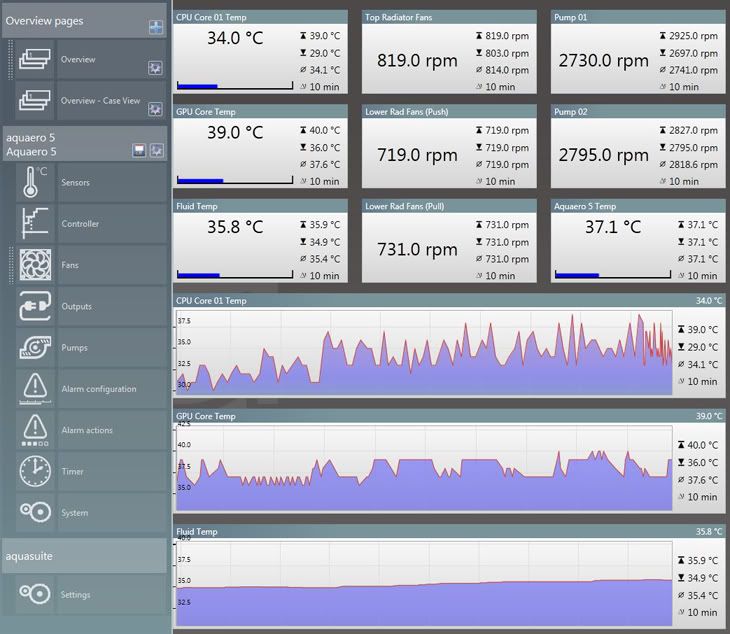
Now we can jump to the Overview page where you can set up how you would like to view the data that Aquasuite (and Open Hardware Monitor as mentioned in the above video).  You can choose what data points you want displayed, and add graphs to monitor temps, flow rates, RPMs, ect.  You have the ability to customize the look of all the items on this page (colors, fonts, opacity, etc.)  But what you see below is just using the default look.  You can set this page to launch automatically when Windows starts so you can monitor everything from a glance.


This is also a view of another Overview page, but this one has a picture of my case, with the various temp and RPM boxes placed over the hardware components in my system.  Its a neat idea, but I personally think it looks a bit too cluttered.  I prefer the look of the above page instead.


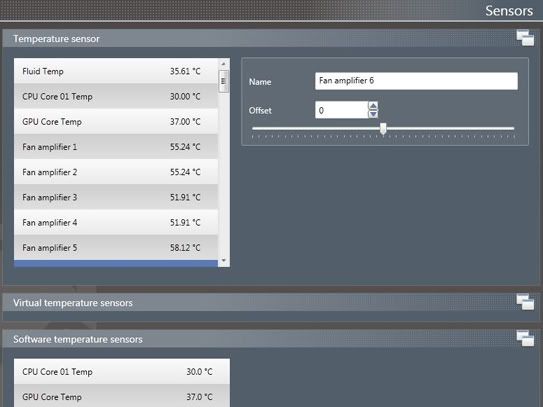
Next up is the Sensors Page.  Here you will see the temps that Aquasutie brings to the table via physical temp sensors (like my in-line temp sensor in my loop), along with software sensors from 3rd party programs like Open Hardware Monitor or AIDA64.  You can modify the names of the various sensors to better suite your needs.


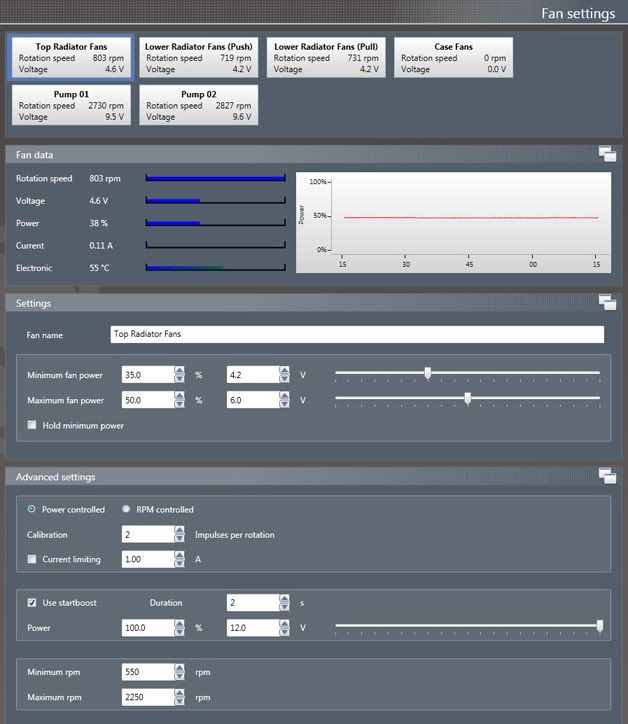
Now we will take a look at the Fan Setup tab.  Here you can name your fan banks, set minimum / Maximum RPM levels, and a ton of other stuff that I haven't had a chance to play with yet.


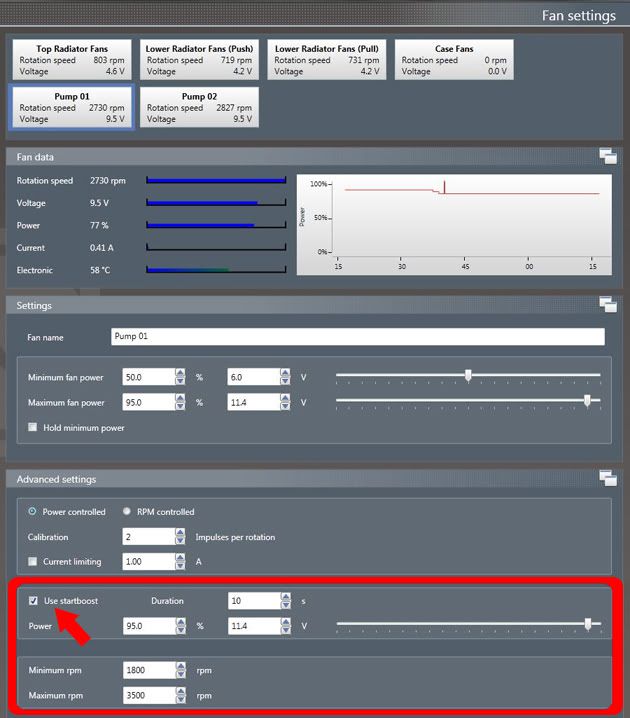
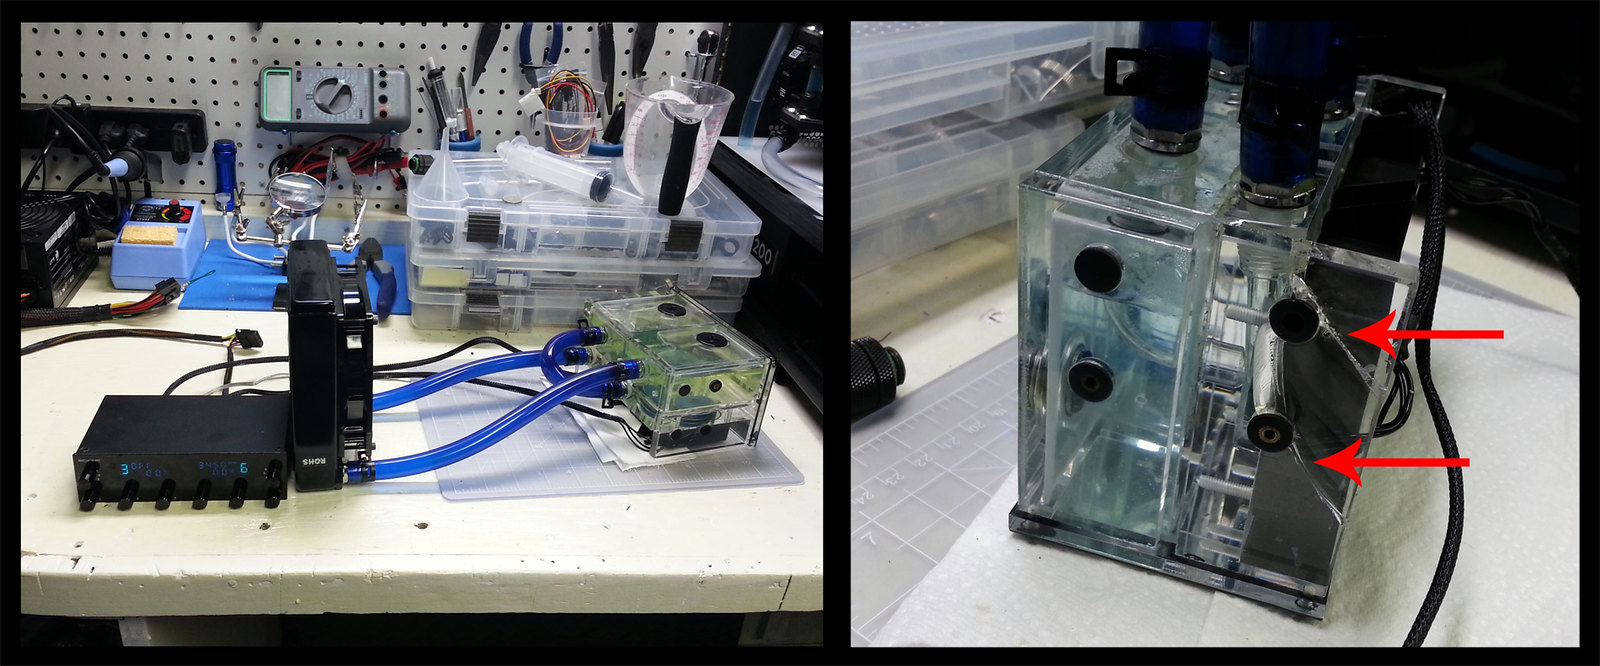
On the same page you can see that my pumps are also visible.  This is because they are connected in the following manner:
Aquero 5 HighSpeed Aquabus connector -> PA2 Aquabus connector 1 / PA2 Aquabus connector 2 -> PA2 Aquabus connector 1

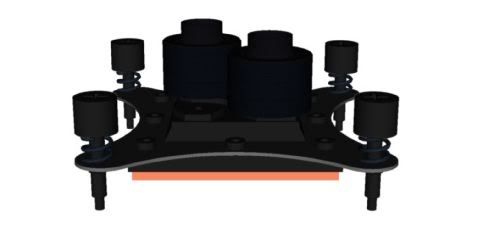
So with that setup, I have 1 pump on each PA2, and they are can both be controlled via the Aquaero 5 in Aquasuite.  The PowerAdjust 2 is a controller which was optimized for the use with a DDC pump (or anything else with a constant load of up to 25W at 12V.)  The maximum surge current can go up to 48W so you have enough reserves for the massive starting current that some pumps or fans generate. A configurable startboost allows you to make sure that for example a pump has enough time to spin-up before it is getting slowed down by the controller.   This Startboost setting can be seen in the image below.


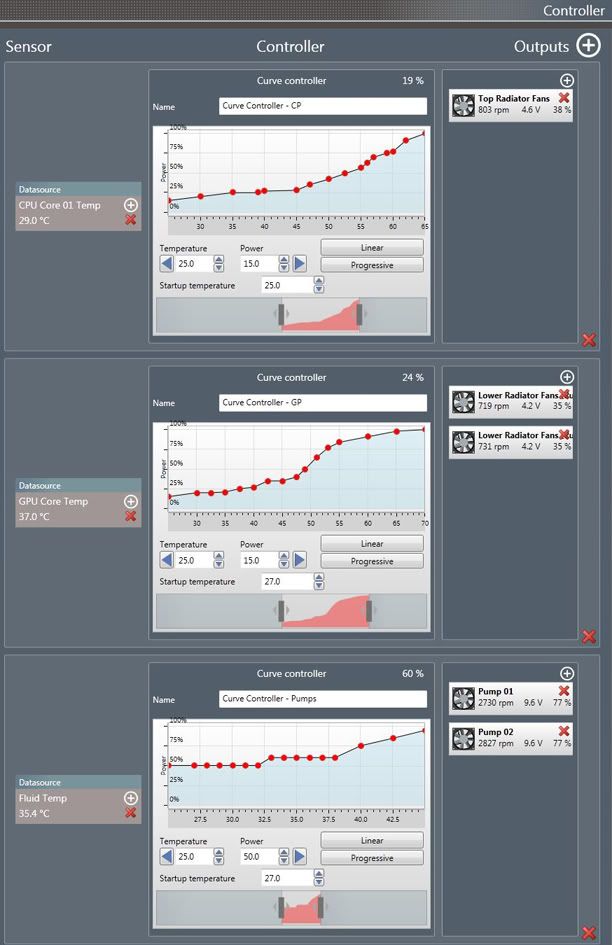
Now we get into the really cool part of the Aquasuite 2012 software... Controller Curves.
With custom controller curves, you can make it so your system runs silent when high power isn't needed, and rev up to 100% when you need that kind of power.  I have set up 3 different curves so far, and they are working extremely well.  When my system first boots up, it is near silent, yet everything stays nice and cool.   My curves don't look "pretty" at the moment as I haven't had much time to really tweak them, but at this point they are very functional.  Once I get everything overclocked, I may have to adjust the temperature variants of these curves.

Controller Curve 01 - CPU Temp controls the 3 fans on the top radiator
Controller Curve 02 - GPU Temp controls the 4 fans on the bottom radiator
Controller Curve 03 - Liquid Temp controls the speed of my pumps


There are a lot of other tabs in the AquaSuite 2012 software, but I either haven't had a need for them yet, or I don't own components that will register with those pages (Aquacomputer pumps for example).  Overall, I am very pleased with the Aquacomputer components and the new software to control them.  In the past my system was near silent except for the pumps.  Now even the pumps are silent during basic computing tasks.

AquaComputer Aquaero 5 vs Corsiar Link Kit

AquaComputer: Pros
  • Extreme Customization and Options
  • Multiple Components available for liquid cooling systems
  • Easy Hardware installation
  • Works with most fans and pumps currently on the market
  • Controller Curves
  • Software seems stable and is feature rich
  • Build Quality
  • 4 Fan Connectors (Upgradable To 10)
  • Optimized for liquid cooling systems
AquaComputer: Cons
  • Much of the documentation is only in German (English Forum is a big help)
  • Setup isn't as straightforward as could be
  • Cost (for some)

Corsair Link: Pros
  • Easy Hardware installation
  • Controller Curves
  • Software is easy to setup and use
  • Build Quality
  • 5 Fan Connectors (Upgradable with more Control Nodes) 
  • Can read CPU & GPU temps on its own (doesn't require 3rd party programs)
  • Advanced RGB LED lighting control
 Corsair Link: Cons
  • Customization and options not as advanced as competition
  • Not really made for liquid cooling (unless using self contained Corsair cooling products)
  • Fairly new software, can be buggy at times

I have enjoyed taking time to use both units, but after going through various scenarios with my hardware, I will be using the AquaComputer products to control my system components from this point on.  Both kits offer their advantages, but the Aquaero 5 fits my needs better at this time.

Thursday, October 4, 2012

Project Bright Panel: New Koolance Reservoir


Received my new Koolance RP-401X2 Friday to replace my leaking XSPC unit. I really like the look and quality of this new reservoir.


I had to cut the feet off of my Switech MCP355 pumps for them to work with this Res/Pump combo. Once installed they have a lot of head pressure and are pretty quiet.


I then proceeded to bled the entire loop of air bubbles and everything is running cool and quiet. Now I am going to work cable management, and writing up a detailed review / set up guide with the AquaComputer Aquaero 5 LT, and the Corsair Link. Stay tuned.


Thursday, September 27, 2012

I Sprung a LEAK

Just wanted to post a mini-update, along with some crappy findings...
I finished wiring all my fan extensions that I will be using with my fans and the controllers. All have been cut to the exact length, sleeved, tested and work great.


I also decided to post a picture of some of my wiring diagrams that I have done up to help me keep my thoughts straight while making my own cables. Shows how I wired illuminated vandal switches, my light panel, led strip, reservoir LEDs, and fan extensions along with RPM reducers which I may use on the fans not attached to radiators.


So with everything wired up, I decided to do a leak test. Everything was looking great untill... LEAK!! And not just a leak requiring a tightening of a fitting, it was a leak in the seam of my XSPC reservoir.


To add insult to injury, I pulled the res out, and had it sitting on my work bench. My son came in behind me, and managed to pull it onto the cement floor, further cracking the unit. 
I was able to put it back together with my liquid acrylic cement, and fill the seam. Also ran an additional leak test with just the res to see what would happen.


It seemed to fix the leak, but at this point, I am going to toss this reservoir, since I can't really trust it for long term use. New one should arrive any day now.

Wednesday, September 26, 2012

Project Bright Panel: New Corsair "Air Series" Fans

My most gracious hardware sponsor Corsair, sent me the final components to finish up my build. This week I received a bundle-o-fans.  These are their new line of "Air Series" fans, and they look great.  There area verity of types, but they gave me the AF Quite Editions for case fans, and the SP series for my radiators.  Here is the list of what came in:

Radiator Fans (120mm) - SP120s (High Performance Edition) x7
Rear Exhaust (120mm) - AF120 (Quiet Edition) x1
HDD Bay (140mm) - AF140 (Quiet Edition) x1

 
 I really dig the changeable color rings on the fans.  It should look good with my black/blue theme.  Each fan also comes with an adapter that will step down the voltage and manually slow down the RPMs.  Nice that its included, but I will be counting on the Link or AquaComputer for that duty.  The blades on the two types of fans are also different.  The high pressure fans "SP Series" have blades specifically made to push more air through a radiator.  The few reviews I have seen speak highly of them, so I am excited to get them installed.


I have to admit, the extra color highlights they bring the the build are right up my alley.


I did a bit of testing with the new Corsair SP120s against my previous fans, the CoolerMaster Blue LED Silent Fan 120mm (R4-L2R-20CK-GP). Specs on both are as follows.

Corsair SP120:
RPM 2,350
CFM 62
Noise 35dBA

CoolerMaster R4:
RPM 2,000
CFM 90
Noise 19dBA

I actually shot a video of the test, but apparently I was an idiot and shot it upside down with my phone  So here is a screen cap of the test. Used a basic fan controller, a Decibel Meter on my phone (not super accurate), and a simple "blow test" with a piece of paper about 6in in front of the fan. Keep in mind, this is a very un-scientific method of testing these fans, and the Corsair SP fans are made to work better with static pressure that comes with being attached to radiators than just blowing power, but since I have no way to measure that, I did what I could.


At 2,000 RPM, the Corsair SP120 had noticeably more "blowing" power than the CM fan, and was measured at around 43dBA. Again, this could be way off, but its what the meter said. The CM fan at this same speed had less power, and was louder at 48dBA... much higher than its specification of 19dBA.

Two other observations.

1) With the SP120 cranked all the way up to 2,350RPM, it was at the same noise level of the CM fan (when at 2,000RPM), but much more powerful.

2) When I brought the SP120 down to around 1,500RPM, it was barley audible. This was reassuring being that with a good fan controller, for basic computing (web browsing, movies, etc) the majority of the time the fans will be at a noise threshold that wouldn't bother the average individual.

So all I can really say about these Corsair fans at this point is that they are more powerful, and more quiet than my previous fans, and better looking. So I keep them!

After my very rudimentary testing of the fans I own, I came across a much better review that used big expensive equipment, and has Charts / Graphs! I am an Excel monkey being in the Finance field, so I sometimes get overexcited about that kind of stuff

The video review can be found here:

Corsair AF & SP Series Computer Case Cooling Fans Review

And here are the juicy details. So it look like when comparing static pressure, which is what the SP120s are supposed to be made for, they in fact perform VERY well. The only thing the chart does not show is what RPM these fans are running at, but it still paints a pretty positive picture for using the SP series fans with radiators.


Turns out the Decibel Meter on my phone may not be that far off. At full RPM, I was reading around 48dBA, which is what their results were as well.   Next step is for me to hook up my various "Smart" fan/system controllers to see which will work better with all the different fans and pumps in my build. Stay tuned.

Tuesday, September 18, 2012

Project Bright Panel: Sleeving Completed

MNPCTECH finally has their MOD Ruler / Gauge back in stock, and mine came in this week.  Pretty sweet little modding tool, but I won't have a chance to use it this time around since I am wrapping up the build.  But since I can't seem to go more than 6 months without modding / upgrading something, it will get plenty of future use.


All major sleeving is now complete.  All I have left on the build is to connect all my fans an pumps to the AquaComputer / Corsair Link, and finish my tubing runs. 

I know for sure that I will be using a two (2)  AquaComputer USB PowerAdjusts to control my pumps, since they operate independently from other monitoring component.  I will be testing the Aquero 5 and Corsair Link separately to see which will end up in my system long term to control my fans.

I still have to secure some of the cable runs to the back of the case with my cable clamps from MDPC, but here is a basic shot of all the major cables connected.  Also in the pic is the SATA Power cable that I connected to the Hot Swap plate.  It was very easy to sleeve, but a pain to get the actual wire to go in the connector.  Ended up using a hammer to "tap" the two parts of the connector together.


I pretty much have everything set up now to start playing with both the AquaComputer Aquero5 and the Corsair Link.  Just finished making my cables for, and sleeving the Poweradjust USB 2 pump controllers.  I will be using them independently from the other control/monitoring units. From what I have seen from other users online, both the Aquaero5 and Link have a lot of capabilities.  It just going to come down to which fits my needs the best.

Along with the Poweradjust USB 2, here is a shot of the 5mm Blue LEDs I just wired and sleeved, and a preview of how they will look inside the res.  No liquid yet.


Once I decide on which control unit to stick with, I can finish the cable management up no the back of the case.  Even with using MDPC sleeving on all of my cables, there are still A LOT of cables to deal with.  I don't know if it will look as clean & tidy as I originally envisioned it, but already it is a huge improvement over the spaghetti wire mess that used to abide back there.

Monday, September 17, 2012

Project Bright Panel: New Sponsor & Components

I am very pleased (and grateful) to announce that Corsair has decided to help me out this with build by supplying me with an AX1200 PSU, Sleeved Black Cables, and a Corsair Link Temp Control & Lighting Kit.  I was surprised when I got the news of a sponsorship from Corsair, but will gladly use their great products in this build.  Thanks Corsair!


Here are some beauty shots of the AX1200 that just arrived. I was previously rocking a 1000w Silverstone PSU, but was getting close to the top end of its range (hitting 970-980w) when benchmarking with everything OC’d.  The extra 200w will come in very handy, especially if I ever go Tri-SLI.  The pouch the PSU came in was a soft suede material.  The overall packaging was of high quality, and of course the PSU itself looks great in the 800D.


Here is the full Corsair Link Kit that includes the Temp Monitor / Fan Control, and the LED lighting component.  I’m not sure if I will be able to use the LED strip this go around, as I have already installed one in this build.  But I like the fact that is so customizable using the Corsair Software, and since its an RGB LED strip, the colors can change based on usage (gaming mode), or vary based on system temps.  I am going to run the Link and the Aquero 5 to see which one better suites my needs with this specific build.


On the right is a Set of Black Sleeved cables for the AX1200 from Corsair.  I had already decided to sleeve my own cables this go around, but will be using the “guts” from these for my custom cut lengths.

I have to admit, these sleeved cable packages made by Corsair for their PSUs are a great value proposition.  If someone just wants one specific color of sleeved cables, these are a great deal, especially when you factor in the cost of sleeving materials, and the time involved to sleeve and entire set of cables yourself.  The connectors are also of high quality (although different layout than standard PSU connectors, more on that later), and the sleeving material is a tad thinner than the MDPC variants, possibly making things a bit easier when trying to manage your cable clutter.  Overall for may individuals, these cable kits are a great buy.

But… not everyone will want these types of kits.  I can see three main reasons why these would not be for everyone.

  • Perfectionists will notice that the heat shrink tubing is not even lengths across the connectors.  For those going for looks / beauty, that could be a turn off. 
  • Custom Cable Lengths can make cable management a lot easier.  I for one have decided to go that route for this build, but in all fairness I did still use these cables, simply cutting them to my preferred length, re-crimping one side of the cables, and resleeving with MDPC sleeve.
  • Custom Color selections.  Right now these kits seem only to be available in solid colors.  Many sleevers like to use multiple colors in their strands.  I am using 2 colors in this build (black & blue), hence the need for me to resleeve these cables once I had cut them down as stated above.

So for some, these sleeved kits by Corsair are great time savers and can fit a specific need (single color)  very well. For others of a more DYI nature (or OCD / Perfectionists), they will be better off making their own sleeved cables.  To the left below is a close-up of a few of the connections from the kit.


 Above right is a picture comparing the connector for an 8-pin CPU Power connection.  This is the side that plugs directly into the PSU.  This was not a problem, but something I just found to be interesting.  The AX1200 has a different connector layout compared to a standard 8-pin CPU connection, as can be seen in the above diagram comparing the two.  I had already completed an 8-pin sleeved set before the PSU arrived, only to find out it wouldn’t plug in.  Luckily with the MDPC Pin remover, I was able to switch out to the one that comes with the AX1200 in just a few minutes.  All is well.


 And here is my completed 24pin Cable/Connector.  The AX1200 has the 24pin cable split into two connectors where it plugs into the PSU.  The pic on the left is one of those two connectors.  Not perfect compared to sets from the “Pros” that I have seen, but it is getting easier each time, and my results are improving bit by bit.  Even with it getting easier (and faster)…  I have found that sleeving still takes a LONG time if done correctly.

Project Bright Panel: SATA Cable Sleeving

I worked on sleeving my SATA Data last week, but ran into a bit of a hiccup.  Two of my 5 cables have both right angle ends.  It is near impossible to get the shrink tube over those ends, so I was only able to sleeve the SATA cablest that had a least one straight connection.


I ordered some new cables from Newegg that can be sleeved property.  Ended up getting some round SATA cables for easier cable management.  They arrived Friday along with some other components. 

And just a word of advise to anyone that wanting to sleeve their SATA cables... I had to stretch out my shrink tubing (a lot) for it to go over the connection heads.  Otherwise it is VERY difficult to get them over.  Maybe it is just the brand of cables I am using, but it seemed much more difficult than it should have been.

Finally got around to sleeving my new Round SATA Cables.  The look great and are a bit easier to bend.  Also went ahead and sleeved the motherboard header pins along with the USB header from the front panel.


I ran into a bit of a problem when trying to plug the cables into the mobo with the heat-shrink tubing installed.  They were a bit more stiff than normal, making them difficult to bend, and adding a bit too much stress for my liking in the SATA port.  So I ended up using my heat gun again on the areas that had the shrink tube making it nice and hot.  While still pliable, I inserted the SATA Cables into the Motherboard, and allowed them to cool with the exact bend angles that I wanted.  Now they fit perfectly without any undue stress on the ports.


I now have everything I need to finish sleeving the rig. Will update with more pics soon.

Thursday, September 13, 2012

Project Bright Panel: Panel Construction & Sleeving

I decided to provide more clarification on how I built the illuminated mid panel.  So here is a "cut-away" view of the light box I constructed that sits atop the mid panel.  


There are many other ways to go about doing this, but after some experimenting with different materials, and thickness, this is what turned out the best for my needs.  Hopefully this along with the close up pictures I have posted, will clear up any other questions that still may be floating about.

In addition to the cut away view of the illuminated mid panel above, I have uploaded my SketchUp modle to the 3D Warehouse.  It shows an assembled view, along with an exploded view of the panel.  Dimensions are inches because that is what my local plastics shop required to make the cuts.  It can be downloaded here.


I have also made available my 3D Modle for the Swiftech Apogee HD CPU block.  Get it here.  There are other waterblocks on the 3D Warehouse, but I couldn't find any for the newer Apogee HD, so I made it.


Sleeving

I knew it would take a while to make my own custom length cables (for better cable management), and then sleeve them... but I had no idea my fingers would get so abused in the process.  Stretching out the sleeving material over and over again to get it nice and tight over the wires has taken its toll, especially on the ends of my thumbs.   Too bad the large calluses on my hands from weight lifting don't extent to the tips of my fingers and thumb.  Going to take a break for a day or two and finish my tubing runs.

But a little discomfort is well worth it to get good looking sleeved cables.  Not too shabby for my first attempt using MDPC materials.  I also want to say that the MDPC Crimping tool is worth its weight in gold!  Such a great crimping tool compared to others I have used.  Perfect crimps every time! :D


Here is a small update on the case.  I spent a bit of time working on my tubing runs to give my fingers a break from sleeving.  Not complete yet, but this will give somewhat of a preview of the look I am going for. 
***I no longer plan on using the blue tubing.  I will be using clear, but until it arrives, I am checking lengths with what I already have on hand.