Featured Post

My Online Courses

Welcome to my project blog! To help you create your own versions of my projects, I've launched a series of comprehensive online courses....

Showing posts with label Firearms. Show all posts

Tuesday, January 25, 2022

Under $100 Weapon Light with Rail Mount & Pressure Switch


Today we are looking at a little project that I was working on in an attempt to find the best rail mounted weapon light I could find for under $100, to be installed on my IWI Tavor SAR rifle. 
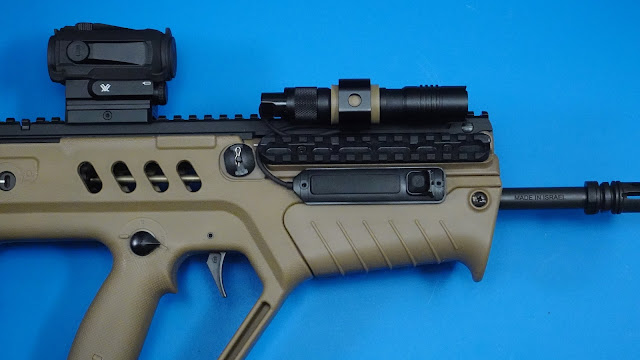

Now, if you have ever searched Amazon or Optics Planet for weapons lights, you will know there are tons of options that are under $100. Problem is, most of those are junk, or made for airsoft rifles and won’t stand up to the recoil of actual firearms. I have nothing against Airsoft, have a few riles and pistols myself, and my kids and I have fun with it. But optics and gear made for airsoft should never be used on actual firearms. 

There are also lots of great options at higher price points.  I own a few of those as well, and am very happy with them. But for this video we are focusing on the “Best Buy” for under $100.  The requirements I selected for this light are that it be at least 300 lumens, can work with a Pressure switch, uses a low profile rail mount, and have good battery options. I test 5 different lights and setups and have narrowed the results down to a clear winner. So, here we go!

This particular setup is using parts from 2 different light manufacturers. The light and pressure switch are from Streamlight and the mount is from O-light. Total parts cost was only $88.  Links for these items can be found below.


The weapon light is a Streamlight ProTac 1L-1AA.  This light has an output of 350 lumens, and runs off a standard CR123A battery. You can also use a AA battery in a pinch, but at a lower brightness level, which I though was a neat trick.  Now some people will balk at only 350 lumens output, but let me be clear that this is being used for a “home defense” rifle. As great as a 1000 lumens light is, using that indoors on white walls is an easy way to temporarily blind yourself with your own light. 350 lumens is great for this purpose, and has plenty of reach to it. 

To secure the light we have the O-Light W-WM25 low profile rail mount. This is made for a standard 1in light, so we will have to do a slight modification to make it work with the ProTac 1L, which is slightly smaller in diameter. They do make a smaller version that would probably work out of the box with the ProTac, but when I was looking, they weren’t available at the time. The mount is made of a strong material that should hold up pretty well to extended use and a bit of abuse. 


The Remote Switch is also made by StreamLight and  is specifically made for the ProTac series.   Standard Streamlight  pressure switches have a female thread that goes over the threads of the larger weapon lights.  This one is made to work with the ProTac lights, and have male threads that go inside the weapon light. Was able to find this one on Optics Planet.  With the parts selection out of the way, lets get this thing mounted and show you what it looks like.  

The mount has a spring mechanism, that allows you to expand the opening to work with various lights, and then securely tighten it around the  light.  It does ship with some adhesive rubber pads to secure lights with a more narrow diameter such as the ProTac. I went a different route and designed and 3D printed a custom sleeve to make things nice and snug, making the diameter 1in, but the rubber pads should work just as good. 

This just slides inside the mount opening, attach the mount to the rails, then tighten the retention screw to secure it to the rail and tighten the light in the mount. It is now very secure, and doesn’t wiggle at all. 

Now we are going to attach the tail cap.  These pressure switches are programable, so you might want to do any customization before you secure the switch to your rifle. The tailcap and cable have a few options for routing the cable. Use what you need to make sure the cable is tucked out of the way on your particular rifle. 


The way I have mine setup is the longer switch is a momentary switch, the the smaller rocker is a standard off/on locking switch. I didn’t want the strobe or the lower light setting, so I programed mine to always us the “high” option. 


So that is it, an $88 weapon light with mount and pressure switch combo.  Streamlight already has a great reputation within the firearms community know for their reliability, and I have weapon lights from them on other firearms that have been performing  great for years.  So I’m pretty confident that this will work great on my Tavor.  There are plenty of other more expensive options out there, but if you are wanting to stay within that $100 mark, this is one of the best ways you can go.  Thanks for stopping by. If you want to check out the video I made for this post, hit up the link below, and as always if you have any questions, hit me up in the comments. Take care. 


Monday, September 25, 2017

DeathTrooper (3D Printed) Storm Trooper, IWI Tavor, and Tannerite

For this project, I had a chance to collaborate a bit with my brother and his buddies at their YouTube channel, How2Man

I have an IWI SAR Tavor, which is a really fun 5.56 bullpup rifle, and thought it would be great to showcase this weapon for this collaboration video, and use it to destroy a 3D printed object using Tannerite.


I found an excellent STL of a DeathTrooper online, which is basically a Storm Trooper helmet that shows a bit of battle damange, and the skull inside.  I increased the size of the print to better allow for us to fill it with around 2lbs of Tannerite.


The entire print took around 36 hours to complete, and once done looked absolutely AWESOME!  I was almost sad that we were going to blow it up... almost.


I added a tad of acrylic paint to make the skull more noticeable. Also drilled a small hole in the bottom of the helmet so we could pour tannerite into the hollow portion.


Here is a short video showing the print and a 3D Render of the object.


And here is a longer video showing the process we went through to fill the helmet and detonate it using the Tavor. There is some cool slow-motion in addition from some drone video from my 3DR Solo. Enjoy!


Monday, October 10, 2016

Remington 870 Stock Upgrades Magpul M-Lock, Archangel Shell Carrier

The first firearm I ever purchased myself, was a Remington 870.  I was a senior in High School, and it has been through a lot of hunts and clay shooting over the last 15 years. It has also been beat up a bit, so I have decided to breath new life into the shotgun by adding a new synthetic stock.   Here it is with the original stock.


For the shotgun stock upgrades, I will be using the Magpul M-LOK systems. They feel good in the hand, and the rear offers an adjustable length of pull.  Plus, I really like the way they look.   The install for the standard 870 was really simple, took about 15min. In addition to the M-LOK I also added a Remington SuperCell Recoil Pad.


Looks brand new!

Also got a hold of a Remington 870 Tactical lately, and didn't want it feeling left out.  It will also receive a stock upgrade with the M-LOK system, and a few additional accessories.


For the 870 Tactical, I picked up a small weapon light to be mounted on the fore grip, and a 7 round shell carrier made by Archangel.  I recently upgrade the stock on my Springfield M1A Loaded to a stock made by Archangel, and have been extremely pleased with it. The install took about 10min, and happy to report it is very solid once installed and does not interfere with the pump action at all.


Final product looks pretty dang good, and it feels great.


Going to give the new stocks a try this weekend.  To wrap up the post, here are a few Before/After pics for comparison.

Friday, May 16, 2014

Springfield M1A Archangel Precision Stock Upgrade

I have had my Springfield M1A Loaded edition for about 4 years, and it is probably my favorite rifle.  Not as easy to modify as my AR-15, but really fun to shoot, extremely accurate, and is now my dedicated Elk rifle. The only thing I don't like about the M1A is that the factory stock (mine was synthetic OD Green) doesn't work that well with a scope and requires a cheek riser.  The Factory stock also doesn't have any way to easily attach accessories requiring modification for things like a bi-pod.

I had previously looked into getting a JAE-100 stock from J. Allen Enterprises to give the rifle a more modern / tactical look and functionality. But I ultimately decided not to go that route because of the extremely high price (almost more than the actual rifle), and the 1+ year wait times to get one.

Recently I came across a new replacement stock for the M1A called the Archangel. When I purchased it from Midway USA, it was on sale for around $120, which is about 80% less than a JAE-100, and it has most of the features I wanted in a new precision replacement stock.


Here is some info on the stock, directly from the manufacturer website.

The next generation, fully adjustable stock for Springfield M1A™ and M14 rifles.  Drop-in fit.  Built entirely of our proprietary, lightweight, carbon fiber reinforced polymer.  Impervious to weather, and will withstand all standard gun solvents and oils.  The Archangel M1A™ Precision Stock is tough as nails, and will deliver outstanding accuracy shot after shot, year after year.

FEATURES
  • Extremely durable construction, yet weighs only 4.2 lbs.
  • Precision fit inlet provides excellent accuracy.
  • Length of pull is thumbwheel click adjustable from 13-5/8″ to 14-13/16″
  • Cheek riser is thumbwheel click adjustable in .05″ increments.
  • Equipped with two standard sling swivel studs.
  • Incorporates 4 integral steel inserts for ball-lock/push-button QD sling swivels     
  • Grip storage compartment
  •  Integrated forend Picatinny rail with extended rail cover.  
Below you can see my M1A with the original synthetic stock, bi-pod, and cheek riser, next to the Archangel stock directly below it. 


Close up of the ribbed "Drop-in" section of the stock.  I am told the ribbed sections offer greater strength while limiting weight.


The angled grip also has a storage compartment.  Currently I have my "BoreSnake" stored in this compartment.


Here is the lower Picatinny rail.  I will be installing my Harris Bi-Pod towards the front using a quick detach bi-pod adapter, and will use a standard rail protector on the remainder of the rail to make it more comfortable to hold.


I decided to add a second smaller Picatinny rail to the bottom of the buttstock.  This was done so that I could use a Mono-pod, Accu-Shot PRM (Precision Rail Monopod) with Quick Knob Option, for greater stabilization when shooting in prone.  I had to file down a small part of the stock where there was a sling attachment, and drill two small holes to accept a Magpul L2 MOE Rail Section. 


Installing this secondary rail was very easy and it works perfectly.


Here is another shot of the new rail directly from the side. Here you can also see the click-wheels that are used to adjust both the length of pull, and the cheek riser.  They work very well, and are pretty solid.


Here we have an exploded view of the M1A's upper receiver, and the trigger assembly, ready to be dropped into the new stock. You can also see the bi-pod and mono-pods have been installed as well.


Here we have the fully assembled rifle along with the new stock.  Installation was very easy with the included instructions. I did have to file down a tiny part of the stock as recommended in the instructions, but overall took no more than 10min to get everything nice and snug.  There is no noticeable play, and everything feels very solid. 


Same as above, but with the bi-pod and mono-pod deployed.  Looks pretty sweet!


I had some extra foam from the hard-case that I made for my Drone, so I decided to use it to make a new foam insert since the stock now has a different shape. 


Using the Pick and Pull foam, I was able to make a perfect "mold" for the M1A's new outline.  It fits perfectly and will do an excellent job protecting my M1A.  I have only had one opportunity so far to shoot with the new stock installed.  My groupings are just as good, if not a tad better, and because of the adjustable components, the rifle is now a perfect fit for me.  I haven't done enough shooting with it to give it a full review, but so far I am very pleased with both the look and performance of this new stock.


Thanks for taking a look.  Now time to get back to my posting progress about the Drone.

Sunday, July 14, 2013

Tannerite vs a Microwave & Cantaloupes

Did a bit of shooting this weekend, and decided to use up some of the Tannerite that I had sitting is my storage room.  Shooting Tanneriate in the containers that it ships in is fun and all, but its a lot MORE fun to put it inside things and watch them go boom.  Here is a little background on what Tannerite is for those who don't know.  From the Tannerite web site:

Tannerite® is a binary explosive used primarily as a target for firearms practice. Tannerite is unique in that it is exceptionally stable when subjected to less severe forces such as a hammer blow or being dropped. It is more than 1000 times safer than ordinary black powder since it is not flammable and can not be initiated by any kind of flame or electricity.  It is supplied as two powders which are combined to produce the explosive.

Tannerite® Company recommends using 0.5-pound (0.23 kg) preparations of the substance, which should detonate when shot by a high-powered rifle. Small caliber rim-fire or slow moving pistol ammunition will not initiate a detonation.

Tannerite® detonations occur at a very high velocity, producing a large explosion and cloud of water vapor. It may be useful for persons who are firing at long ranges; in this scenario, a long-range rifle shooter places targets downrange, retreats to his firing position, and fires. The shooter does not have to walk down range to see if he has a hit, the Tannerite® will detonate and serve as an indicator.
Since the two components are not explosive until mixed, they can legally be purchased in the USA without a license.  They can be legally used for sporting purposes in conjunction with small arms, just like black powder and other exempt sporting powder.

So now that you know what it is, take a look at the video below to see what fun it can be!  I basically just mixed the Tannerite, and placed it into smaller containers, which I then inserted into cantaloupes.


We also used 2 full size containers inside of an old microwave for an impressive demonstration.  Cantaloupes were shot with my AR-15 (5.56mm), microwave was done using my M1A (7.62mm).


Wednesday, March 13, 2013

Install Novelty Ejection Port Cover on AR-15

Around 2 years ago, I purchased a novelty ejection port cover for my Rock River Arms AR-15.  There are lots of these floating around, with various emblems / sayings on them like "Infidel", "ΜΟΛΩΝ ΛΑΒΕ" (Greek: Come and Take), "Get Some", and other more colorful sayings.  Mine is pretty simple and has "Zombie Hunter" etched onto the metal.

The other day, while cleaning my rifle, inside my cleaning tote I came across the port cover that I had completely forgotten about, and decided it was time to install it.  Here is what is needed to complete the task.
  • Novelty Ejection Port Cover
  • Small Needle-nose Pliers
  • Small Roll Punch Pin
  • Tape of some kind
Here is a quick diagram that shows the parts that we will be dealing with:


There are 2 ways to go about replacing the port cover, and I am going to show the easier of the two.  The "correct" method is to remove the the entire barrel assembly (Delta Ring and all) from the Upper Receiver, and slide the ejection port pin out towards the barrel.  But that is way too much of a pain for this simple upgrade.  The method that I will show here took all but 5 minutes to complete.

Start by placing a tape on the Forward Assist so we don't scratch the pretty gun metal while extracting the pin.  The pin will be extracted towards the stock of the rifle.


But first you will have to remove the Pin Retaining Ring.  This can be a challenge as it is extremely tiny, and a tad difficult to remove.  I simply put my small Roll Pin Punch on one side of the ring's opening, and the small Needle-nose pliers on the other and pushed them in the same direction (away from the ring's opening).  BE CAREFUL!!  The ring can shoot off in any direction, and can be hard to locate because of its size.  You have been warned.


With the ring off, we can now gently slide the Ejection Port Cover Pin out towards the stock.  Make sure to secure the Ejection Port Cover Spring before fully extracting the pin being that it can fly off as well.  With the pin fully extracted, replace the old cover with the new one, and line the spring back up where it was previously found.  You will have to bend the longer arm of the spring back a tad so that it will "push" open the Ejection Port Cover when activated.  With everything in place, slide the pin back in towards the barrel.  Once fully inserted, you can now snap the ring back onto the pin.  Easiest way I found was to simply grab the back of the ring with the pliers and push it onto the pin.  Here we have the new cover installed.


That was pretty simple with the right tools, and after 2 years of sitting in the bottom of my cleaning tote, it is finally installed.  Here is a Before and After to compare. 


 Thanks for visiting!