Featured Post

My Online Courses

Welcome to my project blog! To help you create your own versions of my projects, I've launched a series of comprehensive online courses....

Tuesday, January 25, 2022

Under $100 Weapon Light with Rail Mount & Pressure Switch


Today we are looking at a little project that I was working on in an attempt to find the best rail mounted weapon light I could find for under $100, to be installed on my IWI Tavor SAR rifle. 


Now, if you have ever searched Amazon or Optics Planet for weapons lights, you will know there are tons of options that are under $100. Problem is, most of those are junk, or made for airsoft rifles and won’t stand up to the recoil of actual firearms. I have nothing against Airsoft, have a few riles and pistols myself, and my kids and I have fun with it. But optics and gear made for airsoft should never be used on actual firearms. 

There are also lots of great options at higher price points.  I own a few of those as well, and am very happy with them. But for this video we are focusing on the “Best Buy” for under $100.  The requirements I selected for this light are that it be at least 300 lumens, can work with a Pressure switch, uses a low profile rail mount, and have good battery options. I test 5 different lights and setups and have narrowed the results down to a clear winner. So, here we go!

This particular setup is using parts from 2 different light manufacturers. The light and pressure switch are from Streamlight and the mount is from O-light. Total parts cost was only $88.  Links for these items can be found below.


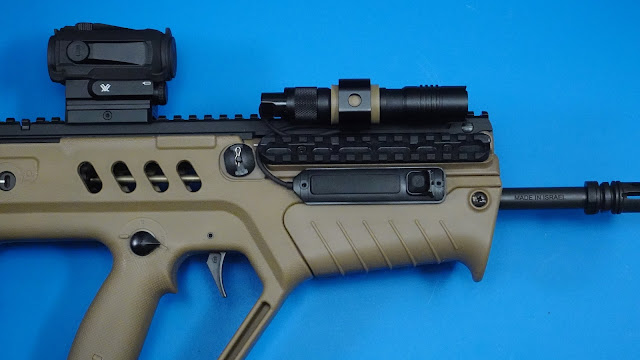
The weapon light is a Streamlight ProTac 1L-1AA.  This light has an output of 350 lumens, and runs off a standard CR123A battery. You can also use a AA battery in a pinch, but at a lower brightness level, which I though was a neat trick.  Now some people will balk at only 350 lumens output, but let me be clear that this is being used for a “home defense” rifle. As great as a 1000 lumens light is, using that indoors on white walls is an easy way to temporarily blind yourself with your own light. 350 lumens is great for this purpose, and has plenty of reach to it. 

To secure the light we have the O-Light W-WM25 low profile rail mount. This is made for a standard 1in light, so we will have to do a slight modification to make it work with the ProTac 1L, which is slightly smaller in diameter. They do make a smaller version that would probably work out of the box with the ProTac, but when I was looking, they weren’t available at the time. The mount is made of a strong material that should hold up pretty well to extended use and a bit of abuse. 


The Remote Switch is also made by StreamLight and  is specifically made for the ProTac series.   Standard Streamlight  pressure switches have a female thread that goes over the threads of the larger weapon lights.  This one is made to work with the ProTac lights, and have male threads that go inside the weapon light. Was able to find this one on Optics Planet.  With the parts selection out of the way, lets get this thing mounted and show you what it looks like.  

The mount has a spring mechanism, that allows you to expand the opening to work with various lights, and then securely tighten it around the  light.  It does ship with some adhesive rubber pads to secure lights with a more narrow diameter such as the ProTac. I went a different route and designed and 3D printed a custom sleeve to make things nice and snug, making the diameter 1in, but the rubber pads should work just as good. 

This just slides inside the mount opening, attach the mount to the rails, then tighten the retention screw to secure it to the rail and tighten the light in the mount. It is now very secure, and doesn’t wiggle at all. 

Now we are going to attach the tail cap.  These pressure switches are programable, so you might want to do any customization before you secure the switch to your rifle. The tailcap and cable have a few options for routing the cable. Use what you need to make sure the cable is tucked out of the way on your particular rifle. 


The way I have mine setup is the longer switch is a momentary switch, the the smaller rocker is a standard off/on locking switch. I didn’t want the strobe or the lower light setting, so I programed mine to always us the “high” option. 


So that is it, an $88 weapon light with mount and pressure switch combo.  Streamlight already has a great reputation within the firearms community know for their reliability, and I have weapon lights from them on other firearms that have been performing  great for years.  So I’m pretty confident that this will work great on my Tavor.  There are plenty of other more expensive options out there, but if you are wanting to stay within that $100 mark, this is one of the best ways you can go.  Thanks for stopping by. If you want to check out the video I made for this post, hit up the link below, and as always if you have any questions, hit me up in the comments. Take care. 


Sunday, October 3, 2021

NanoLeaf Shapes Mini Triangles Unboxing and Review

Today we are going to look at a new product from NanoLeaf, the Shapes Mini Triangles.  Most of you are probably aware of the NanoLeaf Light Panels that have been featured with on a lot of Workstation pictures, but this is a new product as of November 2020, and we are going to go though a quick unboxing, comparison, and review of both the Mini Triangles and the NanoLeaf App used to Setup and Control your shapes.  Lets get started. 

We will be looking at 2 of their new products:

  • Nanoleaf Shapes - Mini Triangles Smarter Kit
  • Nanoleaf Shapes - Mini Triangles Expansion

Lets roll through some quick product specs and see those these mini triangles compare to the larger Light Panels. You can see here they are roughly half the size, but sill about 1cm thick in design. 


Here in the General Specs we see that for the most part things look about the same.  The Mini triangles still only communicate over a 2.4Ghz wireless network. The one big difference to call out here is the lumens drop when going from the Light Panels to the Mini Triangles. That being said, at max brightness, the Mini Triangles can really light up a room, so don’t be overly concerned about that. 


Here we see that both types of panels support the same color spectrum, and in regards to power, the Mini Triangles have a smaller power supply, which makes sense if the lumens output is lower than the larger light panels. The website states that you can connect up to 77 Mini Triangles to a single power supply, but when setting up your design in the application, it state that you can go more than 21 mini triangles, so I’m going to contact NanoLeaf on that one to get clarification


So I created a mock design her to show how what Nanoleaf calls their Linkers connect the triangles and the controller. You might also see that sticker on the right confirming that these just like the larger panels are touch sensitive.


The Linkers have 3 connector pins, and there are little compression tabs that allow it to just snap into place.  They hold pretty well, but don’t try to build the design and then hang it on the wall, you will fail, and it will come crashing down.  


Instead use the Design feature in the Nanoleaf App to plan out your design, and then begin to build it on your wall.  


Its called Layout Assistant and although there are is no way to select colors here, you can design the overall shaped based on the number of panels you will be using. Its drag and drop, and fairly easy to modify.

Once you have your design there is an AR Mode that lets you see it on your wall.  It works OK on a flat wall with nothing else in the frame, but as you can see here, if there are other objects near by, it doesn’t work too well. 

Now I’m going to quickly go through how to setup and connect your panel to the application and your wifi network.  I will state that this way by far the most frustrating part of the installation process for me due to connectivity issues, but more on that in a bit.  If yu9 don't want to read through this, just check out my YouTube video. 


Creating an account is optional, but I would suggest doing it as that will allow you to back up your designs and color scenes for later retrieval. 

Before selecting your shapes from this screen, make sure your panels are plugged into the wall and powered on. 

Select the shapes tab, and it will remind you that in order to connect, you need to be on your 2.4GHz wifi connection.  It will show a list of available 2.4GHz networks, and then ask for a password to connect.  Now on my first run, this worked fine, and everything connected without issue. BUT… after the initial pairing, the light panels kept becoming unresponsive, and I wasn’t ablet to control the kit.  After a few Hard Resets, and moving closer to my router, I was finally able to get it to work, but it wasn’t fun.  None of the other 40+ devices on my network have any issues, so putting the blame for this directly on Nanoleaf. I’m not sure if it’s an issue that can be addressed via a firmware update, or if the Wifi antennae on the controller is just far too small, but whatever the reason, if you aren’t in pretty close proximity to your router, you may experience similar issues. 

After connecting head to your devices tab and select the layout of your panels. By default there is a selection of solid fill lights, multi color, and even interactive music scenes to choose from, in addition to being able to adjust overall brightness. You can go with one of these, or hit the Add Scene button to create your own customized look. 

Again you can utilize existing color pallets, or Add New to create your own from scratch, using rgb sliders or even plugging in the color code directly into the app. 

Once you have your custom color palette you can chose between a motion design that will fade between the colors you selected, or you can go with a static color design, choosing the color for each panel individually. 


Once your colors are selected save your design, and if you aren’t having connection issues, you should be ablet to save it and apply it to your panels.  

After experimenting with a few other options, this is the design that I ended up going with above my PC. It is using 21 panels, currently, but I have a few more left over from the expansion kits, and might add those to the mix down the road. 

Once this product is available on Amazon, I will be sure to add a product link to the video description. 

To wrap things up, despite the connection issues I initially had, overall I’m happy how this accessory add turned out.  The size is just about perfect, it frames my Open Air computer, and adds some nice fill light to my workspace when the overhead fluorescent bulbs are a bit too harsh.  If you are wanting to get into some custom lighting for your workstation, this is a great way to do that, at a much lower price point than what was previously available. 

I hope this video helped give you a better idea of what to expect from this product. 

Hit me up with any questions, and if you guys think a different design or shape would look better above my PC, let me know in the comments.  I’m getting ready to completely rebuild this system, so be on the lookout for that. 

I also have lots of other project videos on the channel, so be sure to check those out as well. 

If you enjoyed this video hit me with a Thumbs up, and as always your subscription helps. 

That’s it for this one, thanks for watching. We’ll see you next time.


Friday, November 8, 2019

3D Printed Stands for Google Home Minis (Andy & ED209 Mech from RoboCop)

We have a few Google Home units spread throughout the house.  A few with screens, and in the kids bedrooms the smaller "Mini" speakers.  The kiddos love to play music on them, and set their alarms for school. As a family, we also use them for an intercom system to get everyone's attention in the house, no matter what room they are in.


The units themselves are pretty simple.  Basically a speaker + mic, with a touch sensitive surface to control playback and volume if not using your voice. Although they look just fine sitting on a nightstand or dresser, my kids wanted an upgrade.  Time to start up the 3D Printer!


Found 2 files on Thingaverse that would work perfectly. For my oldest daughter, Andy the Android giving a cute wave.  She actually picked this one out, and the end result looks great. The other file was a bit more complicated both the print and assemble (not to mention paint). My son loves Legos and robots, so when we saw the ED209 Mech from the 1980s RoboCop movie, it was the perfect fit for his bedroom.  I very much underestimated just how large this model was... but 48 hours later, all the parts had been printed out.


As can be seen below, there is a mix of colors here... since I was going to paint this model, decided I would use up a few random spools of filament that were taking up space and almost on their way out.


I did have to split a few of the larger parts in half when printing, otherwise there would have been far too many supports to deal with.  After printing those parts, just glued the halves together, and then started the priming process. 


Small woodworking clamps come in really handy at this stage.  For the glue, I go with E6000 Craft Adhesive for these types of projects.  It takes a bet to set, but once it does, locks in very tight, and is semi-flexible which is really nice since kids might be playing with this stand. Get glue that is too rigid, and you will find your parts coming apart with even the slightest bend.  E6000 is the way to go.  Here is an Amazon Link for a 3.7oz bottle.


With everything assembled, it is time to start priming. This is a very important step for two reasons.
1) Primier will help cover up any small imperfections that may result from difficult areas to print
2) Painting directly on top of PLA or PETG will result in poor adhesion and the paint will eventually start to flake off.  Get some good primer and go to town. 

You can use any sand-able primer found at your local hardware store for a print of this size, and probably be OK.  I personally like to use primer from "Army Painter" as is goes on very thin, and covers really well.  A thinner coat will ensure that you don't cover up any detail on the model while still prepping the surface for the paint. 


The Army Painter spray on primers are primarily made for tabletop miniatures (which is what I originally purchased it for), but is did really well with this larger model as well.  I highly recommend it for these types of applications. Here is an Amazon link if you want to give it a try.


With the priming complete, I brought out the Airbrush and began to lay down some nice base coats.  With the base applied, I switched over to my brushes and started some of the detail work and accent coloring.  After the colors were all applied, went back over the entire model again with a matte clear coat to protect the paint.  Really pleased with how it turned out, and my son was super excited when he saw it looking over he bed from the dresser.


After these 2 stands were completed, my youngest 2 daughters were not going to be left out of the fun!  They wanted the "Andy" as well, but went with a transparent purple for the body color. Looks great in their room,, but its going to be a challenge for them to keep from touching this little guy!


These were a lot of fun to print out and paint.  My kids really enjoy them, and hope fully they will have them for a long time (if they can keep their hands off).

Here is a quick video I put together that shows much of what I explained above. Thanks for stopping by!


Saturday, January 5, 2019

TableTop Arcade - Video Walk through

Project Index


Video Walk Through


Video that will walk through the primary parts of the system, and show the operation of the Arcade Cabinet.  Coming Soon...


Review - HP Spectre USB-C 20100mAh Laptop Battery Power Pack

I have been looking at a battery pack for my laptop to use while traveling on work trips, and with this unit advertising 20,100mAh and 60w charging rate via USB-C (Power Delivery Spec), I decided to give it a try. This is not the first "Laptop" capable Power Pack I have tried, and up until now the ones I have tested have been a disappointment.   Here is a link to this product if you would like to give it a try.

HP Spectre USB-C 20100mAh Laptop Battery Power Pack - $139 (as of 12/20178)

I have 2 laptops that I tested this with, 1) HP Spectre x360 15t w/ Dedicated GPU, 2) Lenovo T570 ThinkPad 15.6in.  The look and feel of the power pack is top notch, as would be expected from a “Spectre” accessory which in my opinion are the best looking laptops on the market right now.


The unit comes with a nice carry pouch, and a USB C to USB C cable with one end at a 90 degree angle.  This cable supports at least 60w, but is limited to USB 2.0 speeds.


This Power Pack has 3 ports:
  • USB C - 60w Output / 45w Input (Power Delivery Spec for more wattage hungry devices)
  • USB C - 10w Output
  • USB A - 10w Output


The top is a faceted matte plastic and the bottom has a rubberized foot so it won’t slide around. There are also marking on the rubber showing the functions of the various ports.


My Lenovo ThinkPad uses a 65w AC Adapter, and took a charge from this unit without issues. My HP Spectre comes with a larger AC Adapter (90w) as it has a dedicated GPU and Quadcore Processor. I was pleased to see this power pack charge my Spectre without issue and even kept increasing the battery percentage while under heavy system loads like video editing, gaming, and synthetic benchmarking. Impressive.


This Power Pack can be charged to full capacity in just over 2 hours.


I fully drained the battery in my HP Spectre 15t, and this plugged this unit in.  It was able to get my battery from 0 to 70%, which took about 1.5 hours. Interestingly, it actually outputs a higher wattage if the connected laptop is powered down, 62w vs 56w based on my earlier testing.


The other 2 ports performed as expected, and are great for charging phones and tablets.


The only negatives I can find is that it is a bit pricey, but as I have found very few Power Packs that can actually deliver on the 60w promise, not going to hold the price against it. The other thing that is more of an annoyance than an issue, is that when you are fully discharging the battery, after about an hour the unit begins to get a bit hot (around 60c) and you can hear a slight coil whine. It’s not very loud and probably can’t be heard over the laptop fans, but is noticeable in a quiet environment with the laptop turned off.  This doesn’t seem to hinder the devices operation at all, but is something to be aware of.


In my testing, here are the maximum Discharge Rates for each port.
USB C (Power Delivery) – 62w  (19.5v X 3.18A)
USB C – 10w  (4.89v X 2.03A)
USB A – 9.7W  (4.80v X 2.03A)

Charging Rate, USB C (PD) – 47w  (20.3v X 2.35A)

Pros
  • 20,100mAh capacity (TSA Approved)
  • Build Quality looks excellent 
  • Can charge larger laptops via USB C (PD)
  • Can charge 3 devices at the same time (Laptop, tablet, phone) 

Cons
  • Coil whine after extended use
  • Housing heats up to around 60C after about an hour of use 
  • No Pass-through charging 

Overall it’s the only Power Pack I have found that can actually charge larger laptops with a Dedicated GPU like the HP Spectre 15t. The price is on the higher side for a Power Pack of this capacity, but it performs well, and looks really nice so I am ok with the pricing for now. The unit comes with a 1yr warranty, and I will update this review if the coil whine or heat become an issue.

HP Spectre USB-C 20100mAh Laptop Battery Power Pack  (Amazon Link)

Hit me up with any questions you might have in the comments.  Thanks for stopping by!

Project Ecthelion: Project Index

This is simply a "bookend" for the project to help with faster navigation between the project posts.

Project Index

Wednesday, November 28, 2018

Project Ecthelion: Fluid Color Additive

Leak testing... Completed
Benchmarks... Completed
Stress Tests... Completed

Now its time to add pretty colors to the fluid loops!


Sticking with Mayhem's Pastel additives, as I used the Pastel Blue in my current rig, and after 1 year, it still looks great.  Haven't experienced the particulate settling issues some have reported, possibly because of the speed my pumps run.  Whatever the reason, it has been great for me, and I'm excited to see how it looks in this build.


The fill process is pretty basic, but be sure to keep paper towels handy, as this stuff can stain if it makes contact with a wood counter top, clothing, or other porous material.  I used a little funnel to help keep things from spilling and make it easier to fill the reservoirs.


If the system is running while you are pouring the color additive, it will quickly move through the loops as the pumps whip it around pretty fast.  The loops were fully mixed within just a minute or two after adding the colors.


Huzzah!  Kind of looks like "Whole Milk" next to "Blue Milk" from StarWars.  Really pleased with how these 2 colors look together, and how well they complement the case and hardware.

Its taken a while to get this far, but next up... FINAL BUILD PICS!